Customers 360°, cart recovery, automations, send queue, care and ratings, loyalty, warranties, reports and settings — with screenshots of every screen. 26 guides — type in the search box to filter.
No guide matches. Try another word, like “order”, “email” or “points”.
Getting started
Install the CRM on your website
Where: Platform admin→Import project
Every product is a set of text files in the platform's block format. Each runs on its own; installed on the same website, they share customers and orders automatically.
Sign in with the platform's super admin account — background jobs run with the rights of the person who imports them.
Import the 50-background.txt file first. It creates the tables and the background jobs; wait a few minutes for them to start.
Import the remaining files of the zip in the order of their names.
Open /dashboard and sign in again. The menu on the left only shows what your role may use.
Good to know: Installing all three? Import Shopora first, then the CRM, then Postora — the later ones read the data of the earlier ones.
Good to know: Daily jobs use the server clock. If the server runs on UTC, 03:20 on the server is 10:20 in Vietnam.
Your first day with the CRM
Where: Sign in→Settings
The CRM turns every buyer into one profile — from Shopora, Postora, Shopee, Lazada, TikTok Shop, Facebook and Zalo — and then looks after them along the way: cart → order → delivery → warranty → rating → buy again → next tier.
Sign in with a CRM Admin account (or CRM Care / CRM Marketing — the menu follows the role).
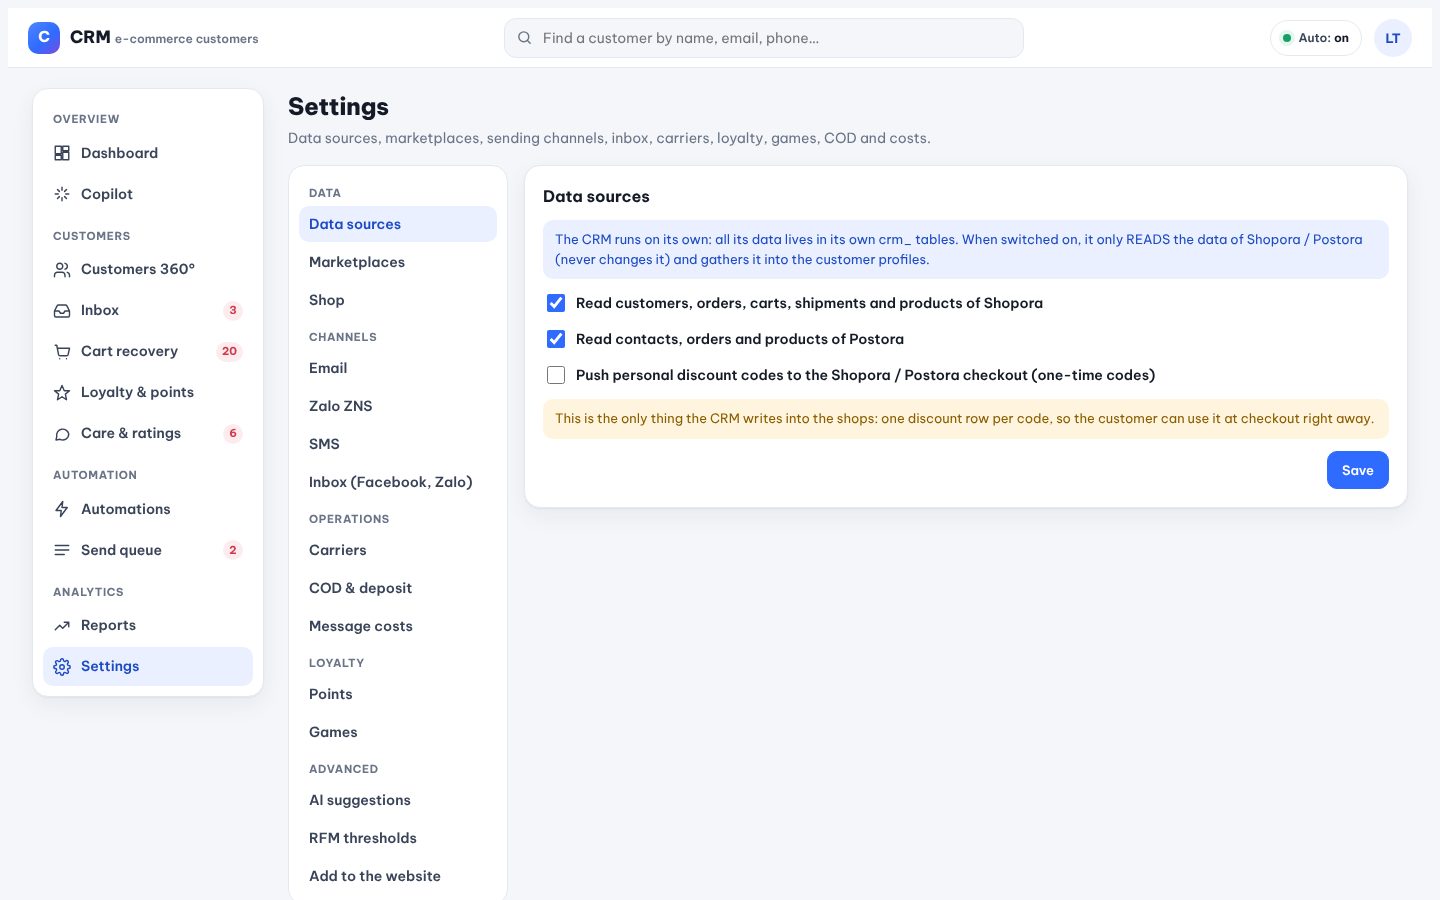
Open Settings → Data sources and tick Shopora and/or Postora if they are on the same website. The CRM only reads them.
Open Settings → Shop: shop name, web address, store address, brand colour and hotline. They appear in every message.
Wait a few minutes: existing customers and orders are imported and the Dashboard fills up.
Good to know: CRM Admin: everything. CRM Care: customers, care tickets, inbox, carts, warranties, COD. CRM Marketing: automations, send queue, loyalty, games, reports.
northwind.shop/settings
Settings → Data sources: the CRM reads Shopora and Postora, never changes them.
Read the dashboard
Where: Overview→Dashboard
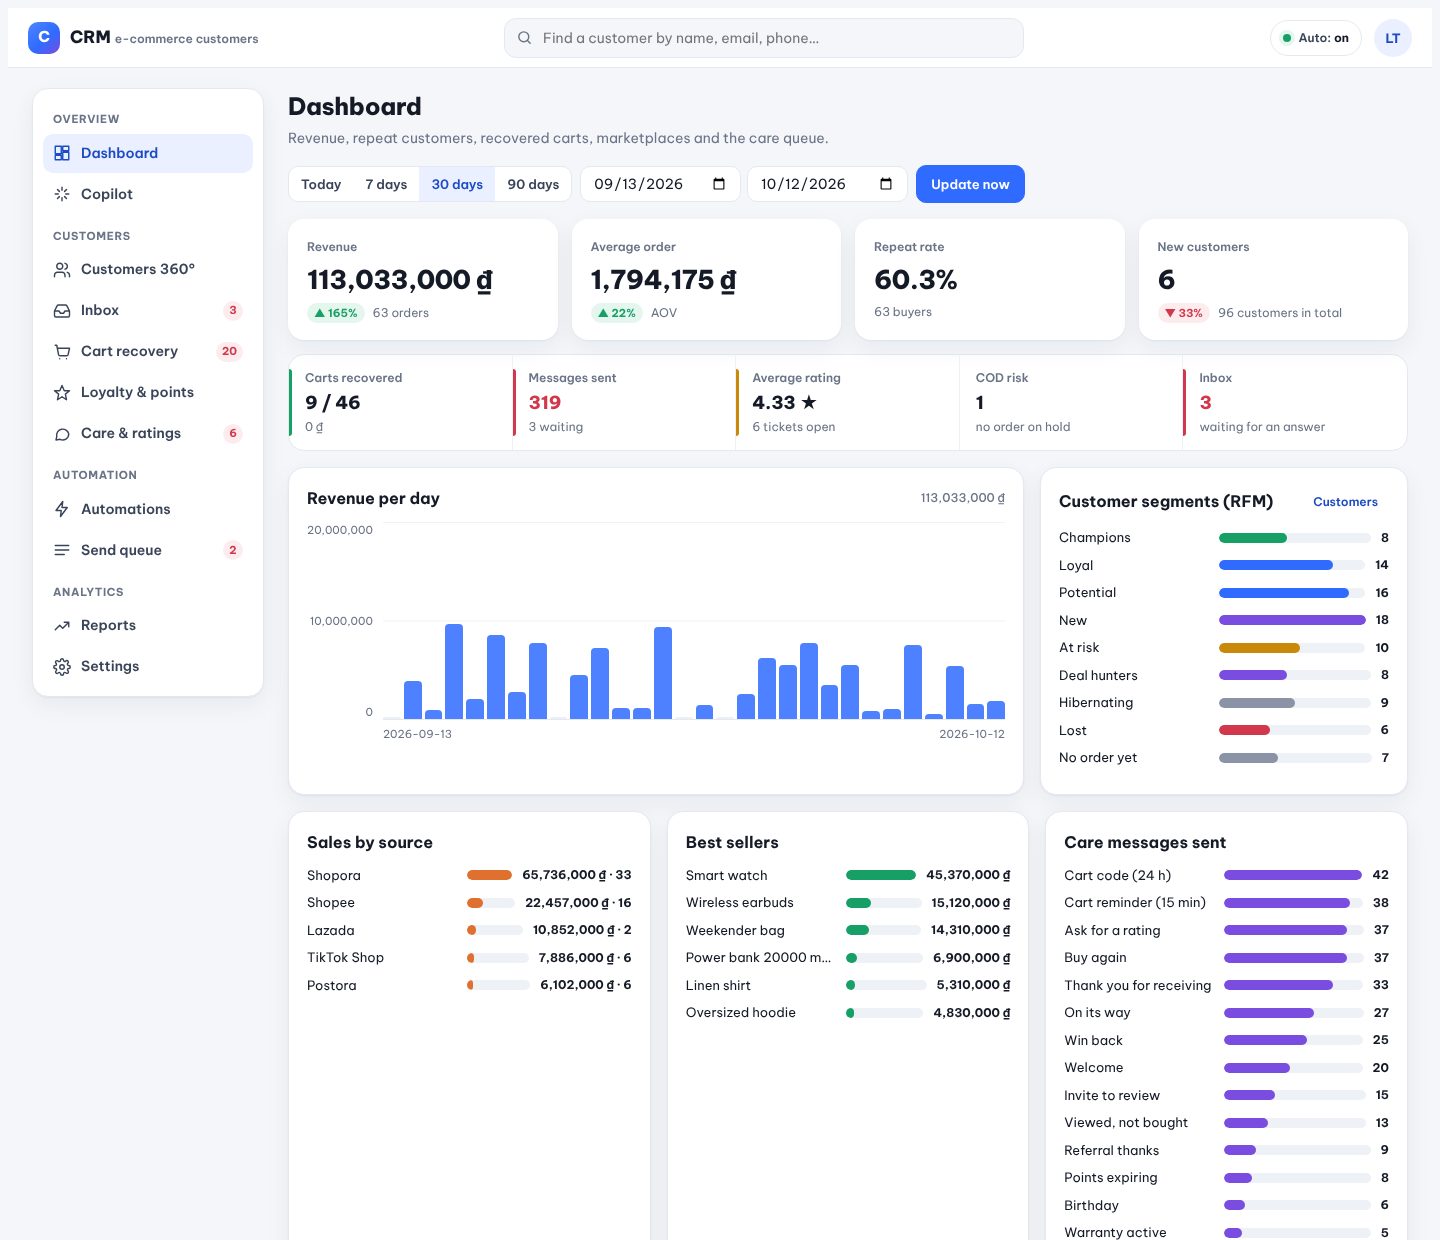
Revenue, average order, repeat rate and new customers for any period, compared with the period before — plus carts recovered, messages sent, rating, COD risk and the inbox.
Pick Today, 7 days, 30 days, 90 days or your own dates.
The coloured arrows compare with the same length of time just before.
Click a tile of the second row (carts, messages, rating, COD, inbox) to open that screen.
Below: revenue per day, customer segments (RFM), sales by source, best sellers, care messages sent and membership tiers.
northwind.shop/dashboard
The dashboard with 30 days of data.
Ask Copilot about your customers
Where: Overview→Copilot
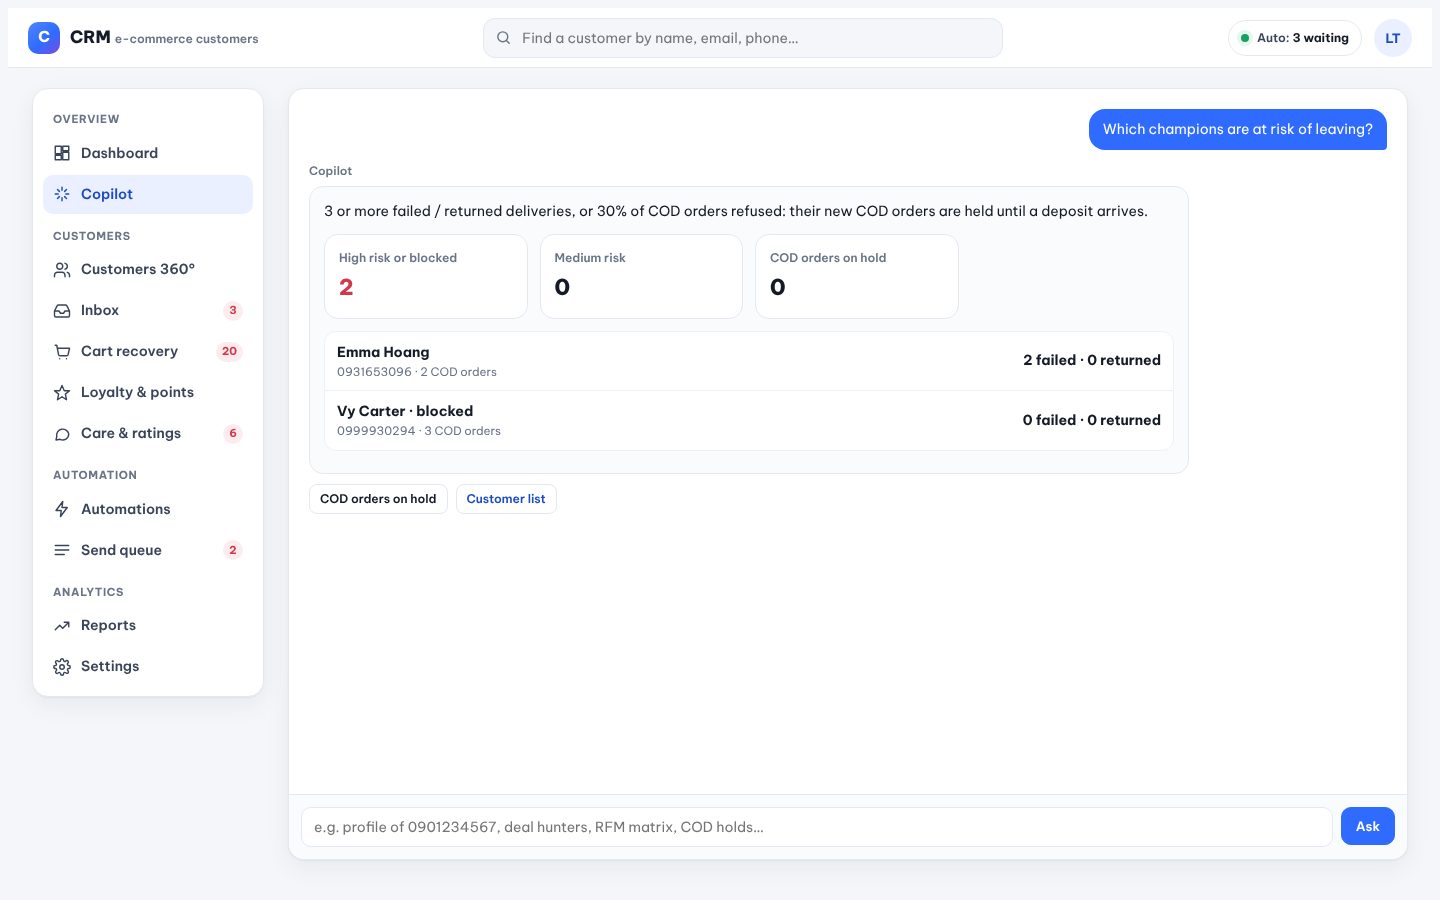
Ask in plain words: “profile of 0901234567”, “deal hunters”, “RFM matrix”, “COD holds”, “birthdays this week”. Copilot reads the real figures and answers with the next step one click away.
Open Copilot.
Click one of the suggestions (Customers at risk, Abandoned carts, COD risk…) or type a question.
Click a name in the answer to open that customer.
northwind.shop/copilot
Copilot answering “Which customers are at risk?” with the real list.
Background jobs on the server
Where: Send queue→Background work on the server
Order emails, care scenarios, campaigns and app notifications are sent by the server every minute — even when nobody has an admin page open.
After the import the jobs switch themselves on (every 1–5 minutes, depending on the job).
Fill in the web address of the shop in the settings: the server needs it to build the links in emails.
Open the Background work on the server card: a green dot means running, red means not running yet, with the last error underneath.
Good to know: Messages that go to outside services (Zalo ZNS, SMS, social networks, Resend/SendGrid/Brevo email) are still sent by an open admin page, because the server cannot call other websites.
Good to know: While the server is running, open pages leave the work to it — nothing is ever sent twice.
northwind.shop/queue
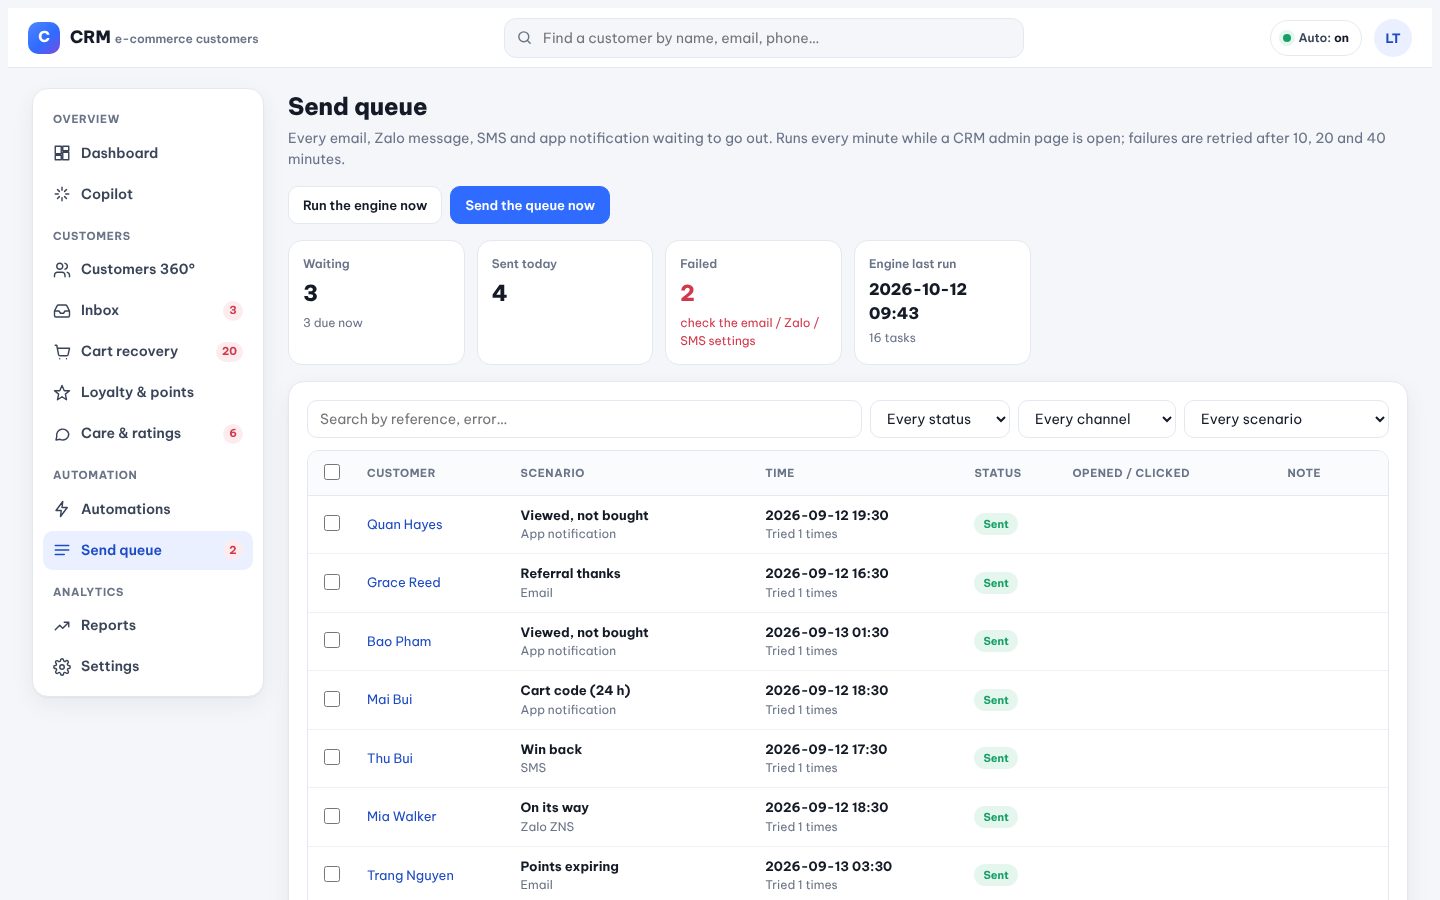
Send queue: what is waiting, sent today and failed, with the time of the last engine run.
Languages and currencies
One language or many, one currency or many
Where: Settings→Languages→Languages and currencies of the site
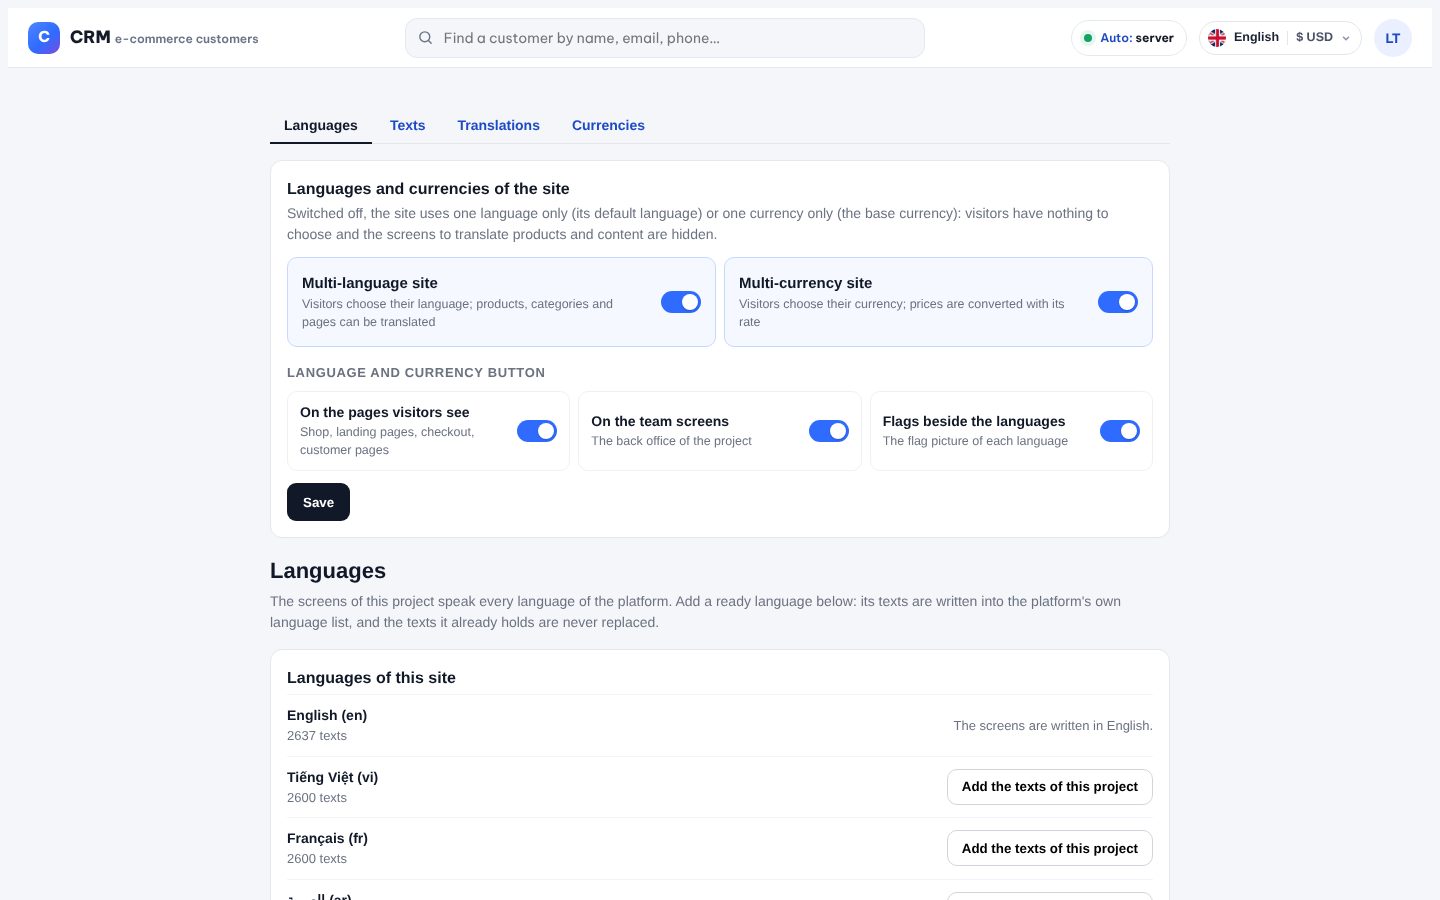
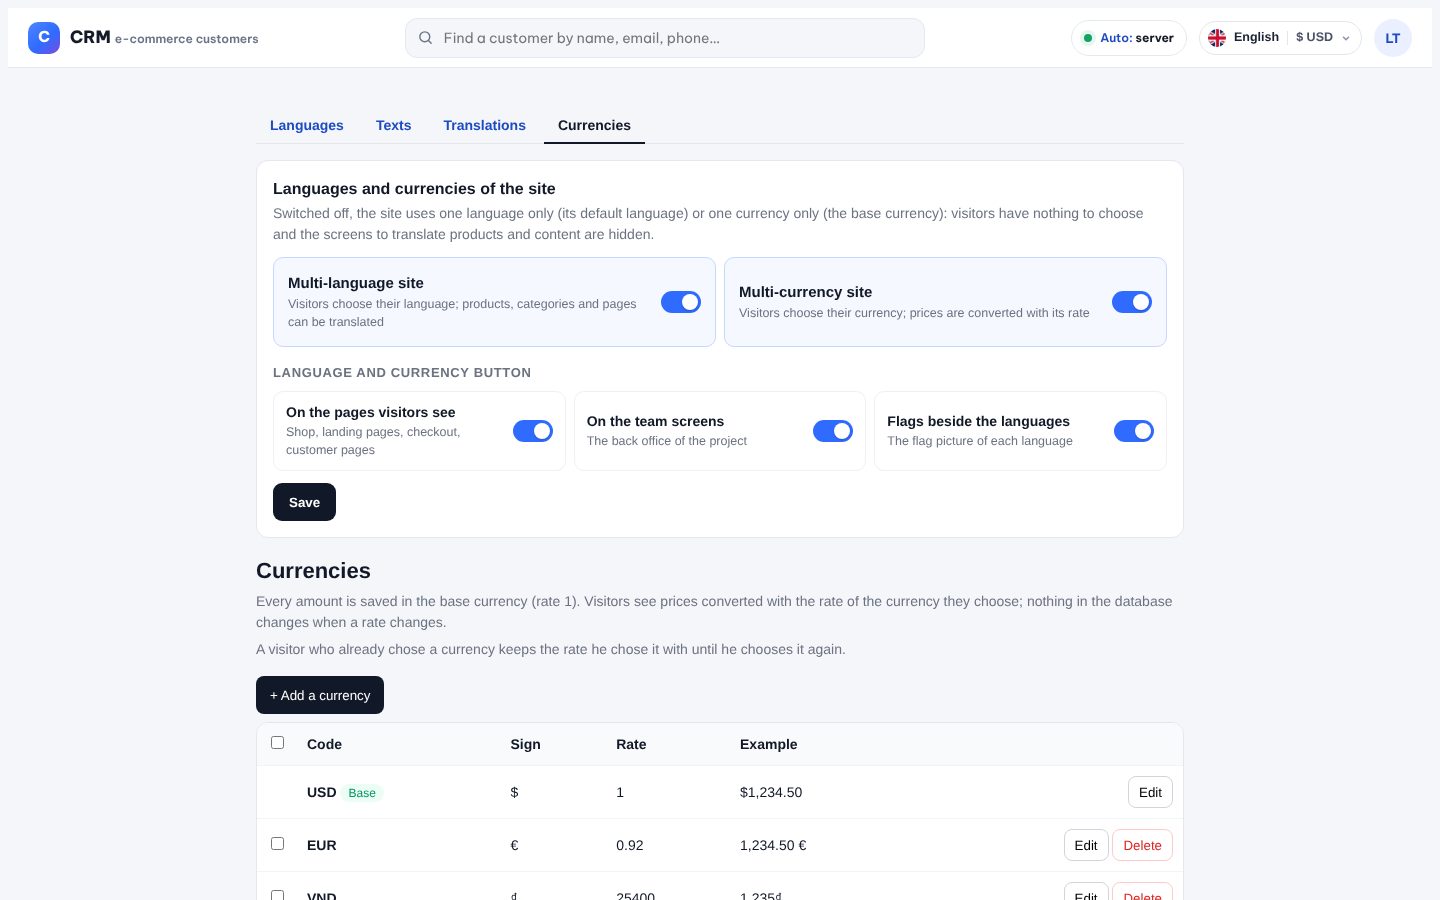
Two switches decide what visitors can choose. Switched off, the site speaks only its default language (or counts only in its base currency): there is no language or currency button, and the screens to translate content are hidden.
Open /crm-language-list (the Languages tab at the top links the four screens: Languages, Texts, Translations, Currencies).
Multi-language site: on = visitors pick their language and your the rewards members can claim can be translated; off = one language only.
Multi-currency site: on = visitors pick a currency and see prices converted; off = the base currency only.
Under Language and currency button choose where the button shows: on the pages visitors see, on the team screens, and whether each language shows its flag.
Click Save. The page reloads with the new setting.
Good to know: Nothing is deleted when you switch off: translations and currencies stay stored and come back when you switch on again.
Good to know: The button docks itself in the header of every theme; on a phone it shows short labels (EN · $).
northwind.shop/crm-language-list
The switches at the top of the Languages screen.
Add a language and choose the default one
Where: Languages→Add a language · Default language
Five languages come ready with every text of the product: English, Vietnamese, French, German and Arabic. The default language is the one new visitors see — and the one you type your products in.
Sign in as the platform's super admin — the list of languages belongs to the platform.
Under Add a language click Tiếng Việt, Français, Deutsch or العربية: the language is created with all its texts and its flag.
A language the site already has: click Add the texts of this project on its row. Texts still in English are replaced; texts you edited yourself are kept.
Under Default language pick the language visitors see first and save. The originals of your the rewards members can claim are written in this language (Vietnamese, English, Arabic… whichever you choose).
Good to know: Arabic switches the pages to right-to-left by itself.
Good to know: If the screen says the server kept fewer texts than were sent, ask your host to raise max_input_vars to 10000 and click again.
Good to know: Visitors who already chose a language keep their choice for a year.
Edit the texts of a language (with Copilot)
Where: Languages→Texts
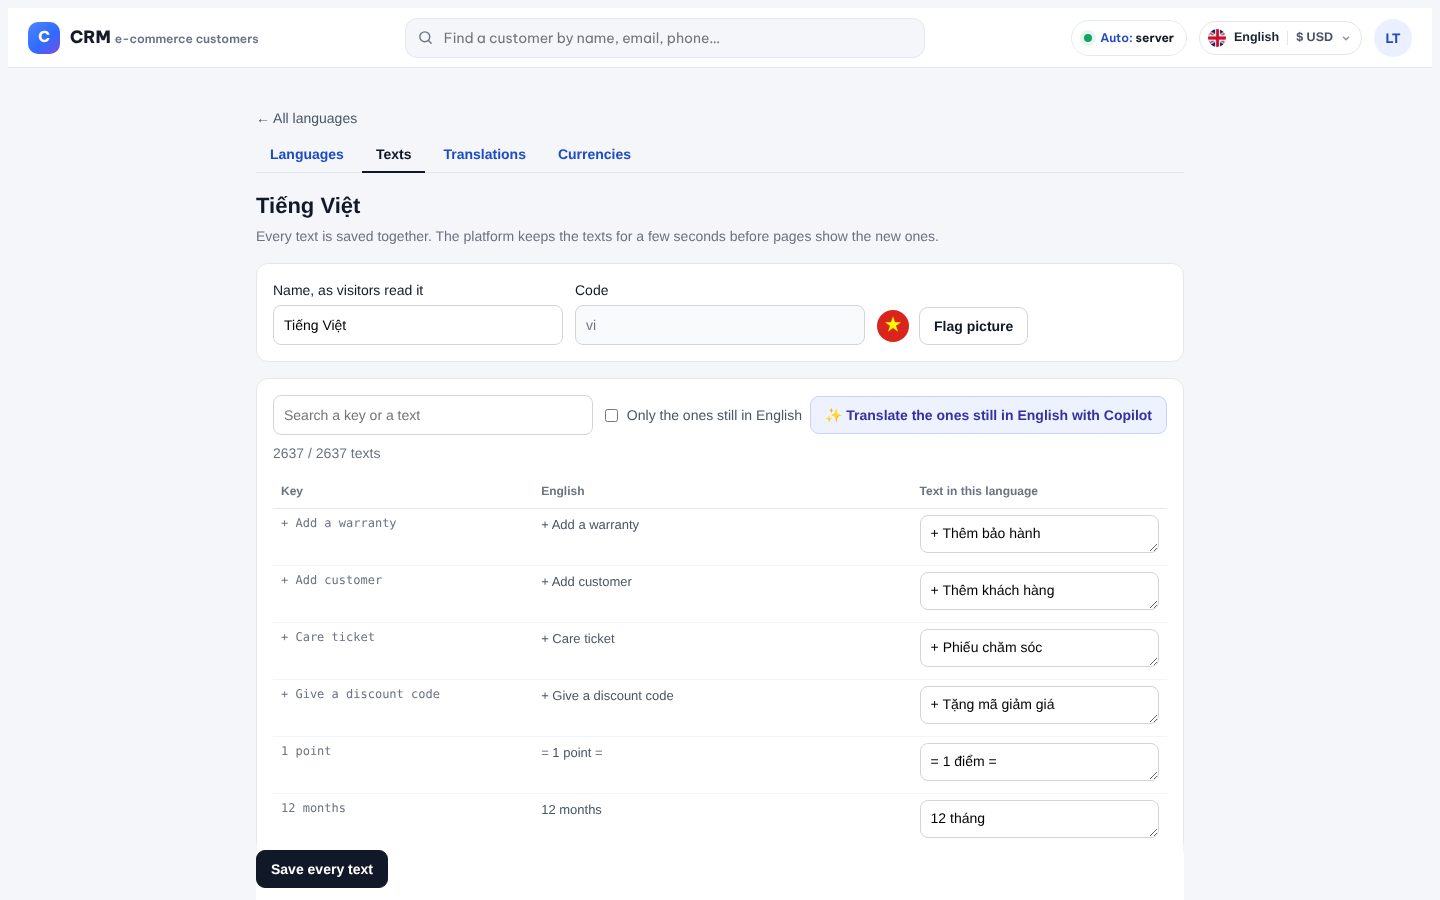
Every word of the screens and of the shop, in each language: correct a translation, finish the ones still in English, or add a language that is not in the ready list.
Open /crm-language-texts and click Edit on a language (or Add a language: name, code such as es or pt-br, and a flag picture).
Tick Only the ones still in English to see what is left. The list shows 20 texts a page; the search box finds a word in the key, the English text or the translation.
Type the translation beside the English text — or click ✨ Translate the ones still in English with Copilot: it fills 40 texts at a time with the site's AI. Read them over.
Click Save every text. Pages show the new words within a few seconds.
Good to know: A text the site uses but this language does not have yet is listed too (still in English), so nothing is missed.
Good to know: Words inside %s, :name or {x} are filled in by the system — keep them as they are.
northwind.shop/crm-language-texts
The texts of one language, with the English text as a guide.
The Translations screen
Where: Languages→Translations
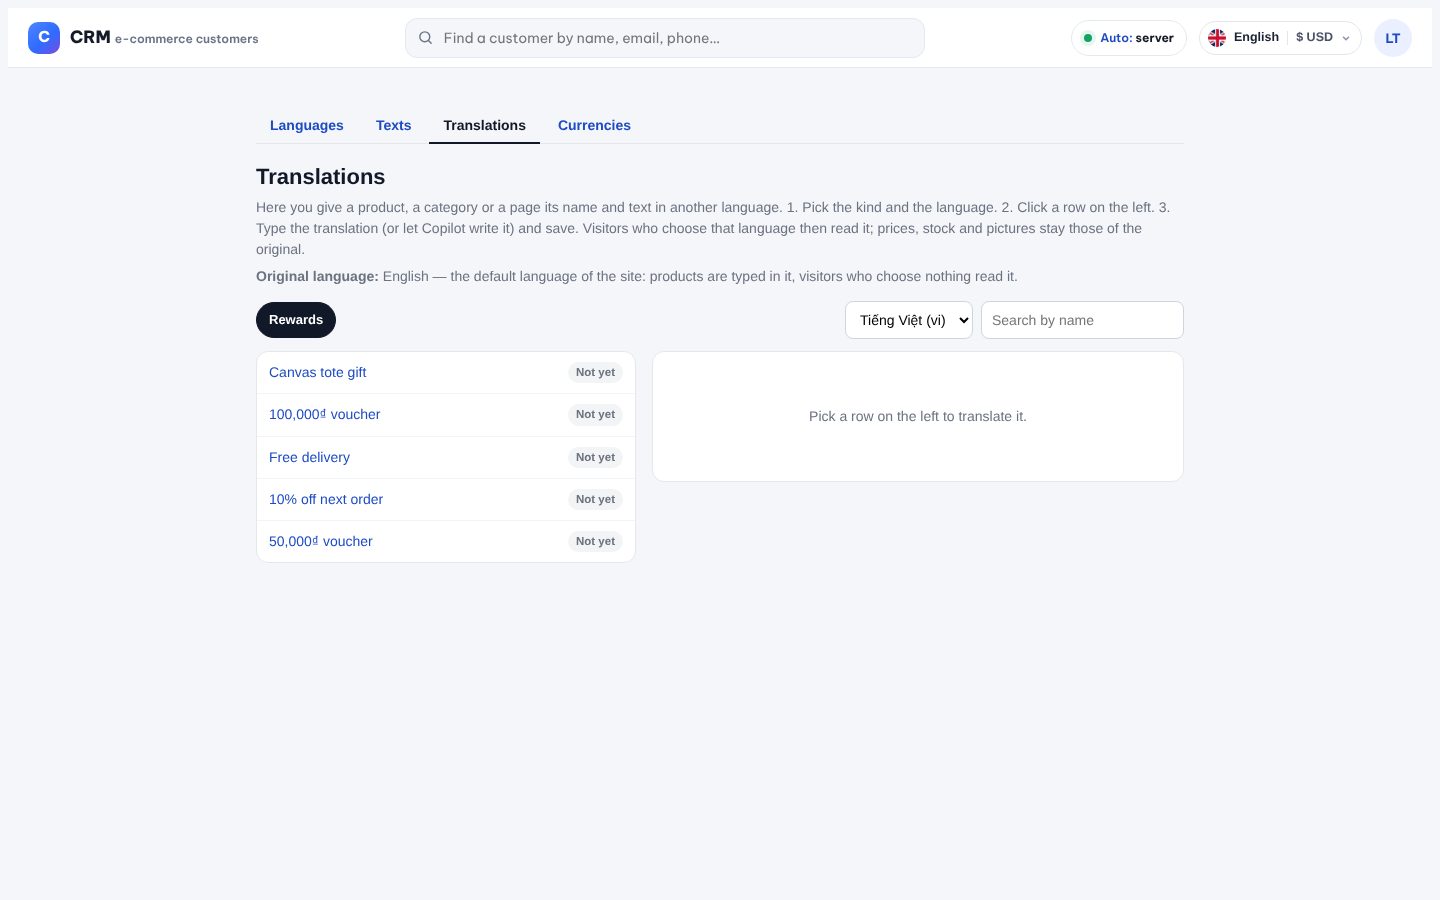
The same translations, all in one place: pick the kind of row and the language, see at a glance what is translated, and fill the rest.
Open /crm-translations.
Pick the kind (Rewards) and the language at the top.
Rows marked Not yet have no translation in that language. Click a row: the original text shows beside each box.
Type the translation or click ✨ Translate with Copilot, then Save the translation.
Good to know: The list shows 20 originals a page, newest first; search by name to find one.
Good to know: Visitors who chose that language read the translation; when a field is left empty they read the original.
northwind.shop/crm-translations
Originals on the left, the translation form on the right.
Page addresses in each language
Where: Languages→Page addresses per language
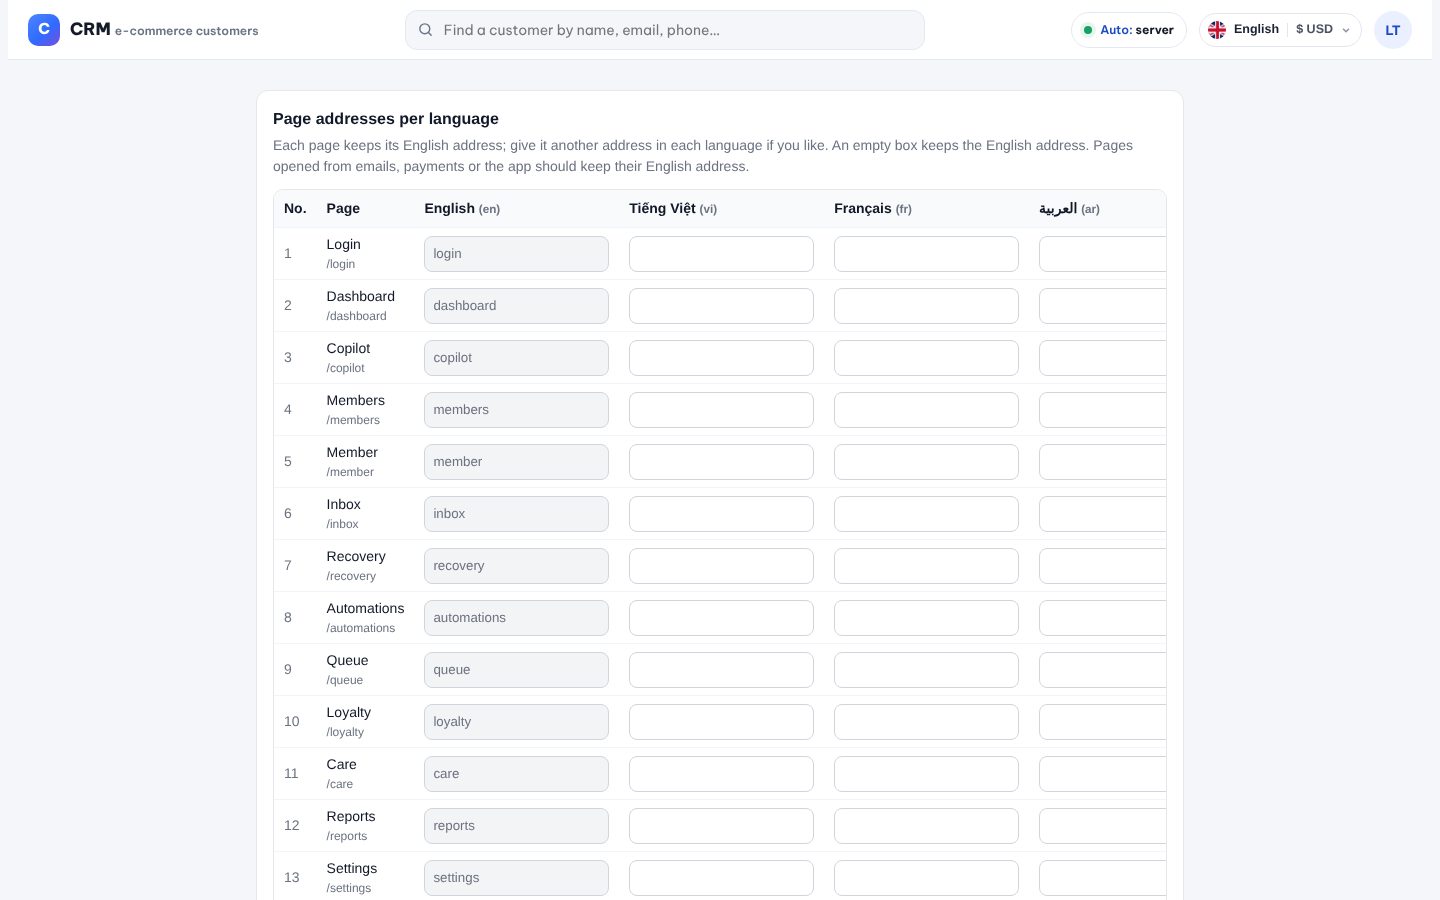
Every page has an English address (/checkout, /blog…). Give it another address per language and links switch by themselves when a visitor changes language — good for search engines.
Scroll to Page addresses per language at the bottom of the Languages screen.
Type the address of a page in each language (for example thanh-toan for Vietnamese). An empty box keeps the English address.
Click Save the addresses. Links use the new addresses within a few seconds.
Good to know: Two pages cannot share one address in the same language.
Good to know: Pages opened from emails, payments or the app (payment return, order tracking links) are best left on their English address.
northwind.shop/crm-language-list
One box per page and language.
Sell in several currencies
Where: Languages→Currencies
Visitors see prices in the currency they choose (USD, EUR…). Orders and reports always count in your base currency.
Open /crm-currency-list (super admin). The row marked Base has rate 1 — do not delete it or change its rate.
Click + Add a currency: code (USD), sign ($) and rate = units of this currency for 1 unit of the base (base VND → USD ≈ 0.0000385).
Choose the side of the sign and whether there is a space, check the Example column, then save.
Good to know: Changing a rate never changes an amount that is stored.
Good to know: A visitor keeps the rate they chose with until they choose again.
Good to know: Switch Multi-currency site off to sell in the base currency only.
northwind.shop/crm-currency-list
Currencies with their rate and an example price.
Customers
Customers 360°
Where: Customers→Customers 360°
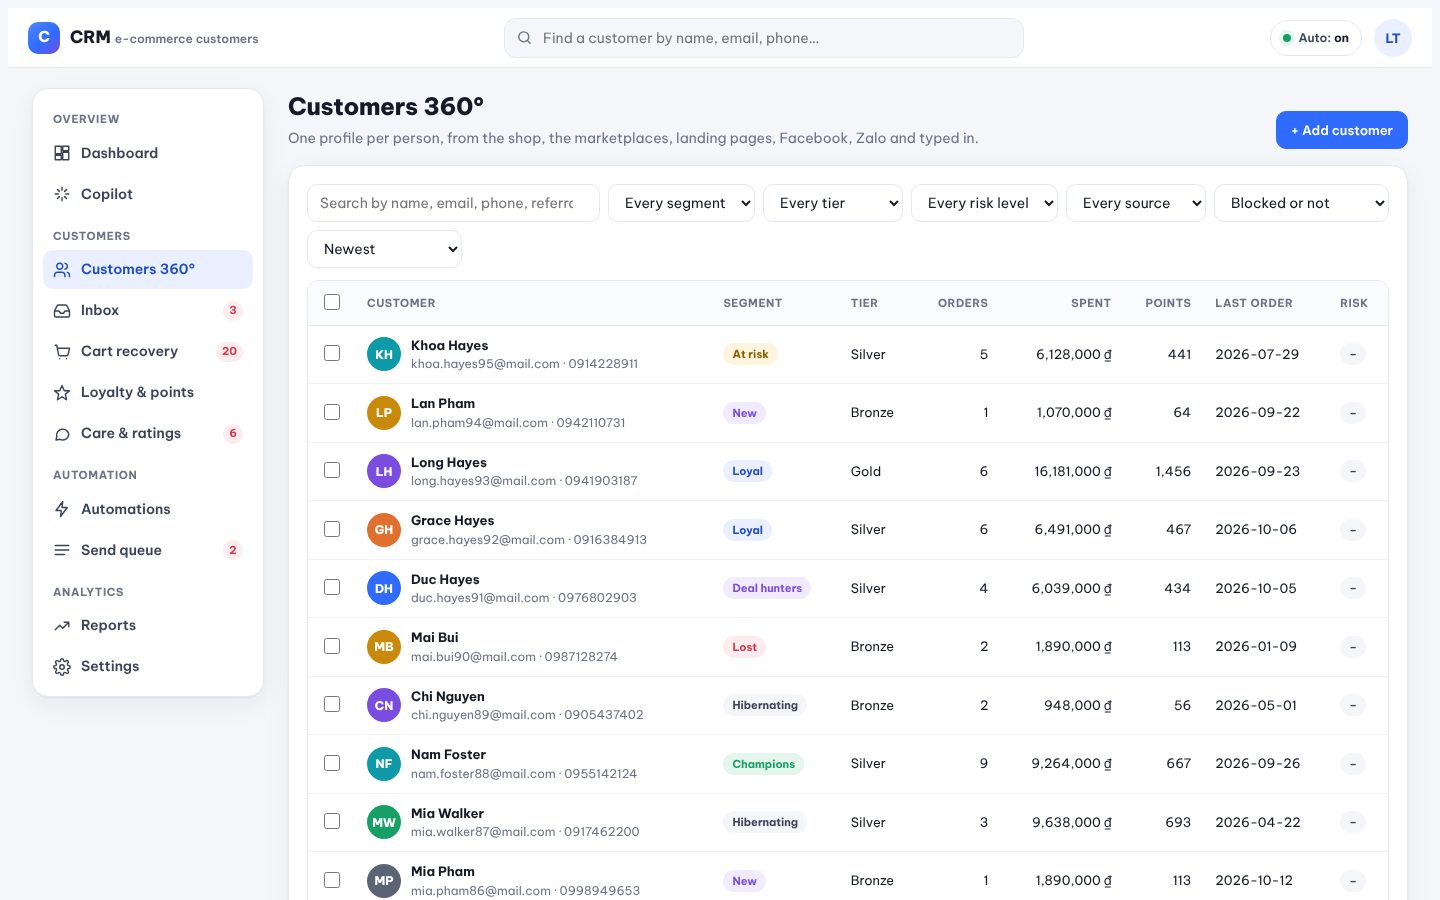
One profile per person: orders, points, tier, RFM segment, channels, notes, tickets.
Open Customers 360°. Search by name, email or phone; filter by segment, tier, risk level, source or blocked.
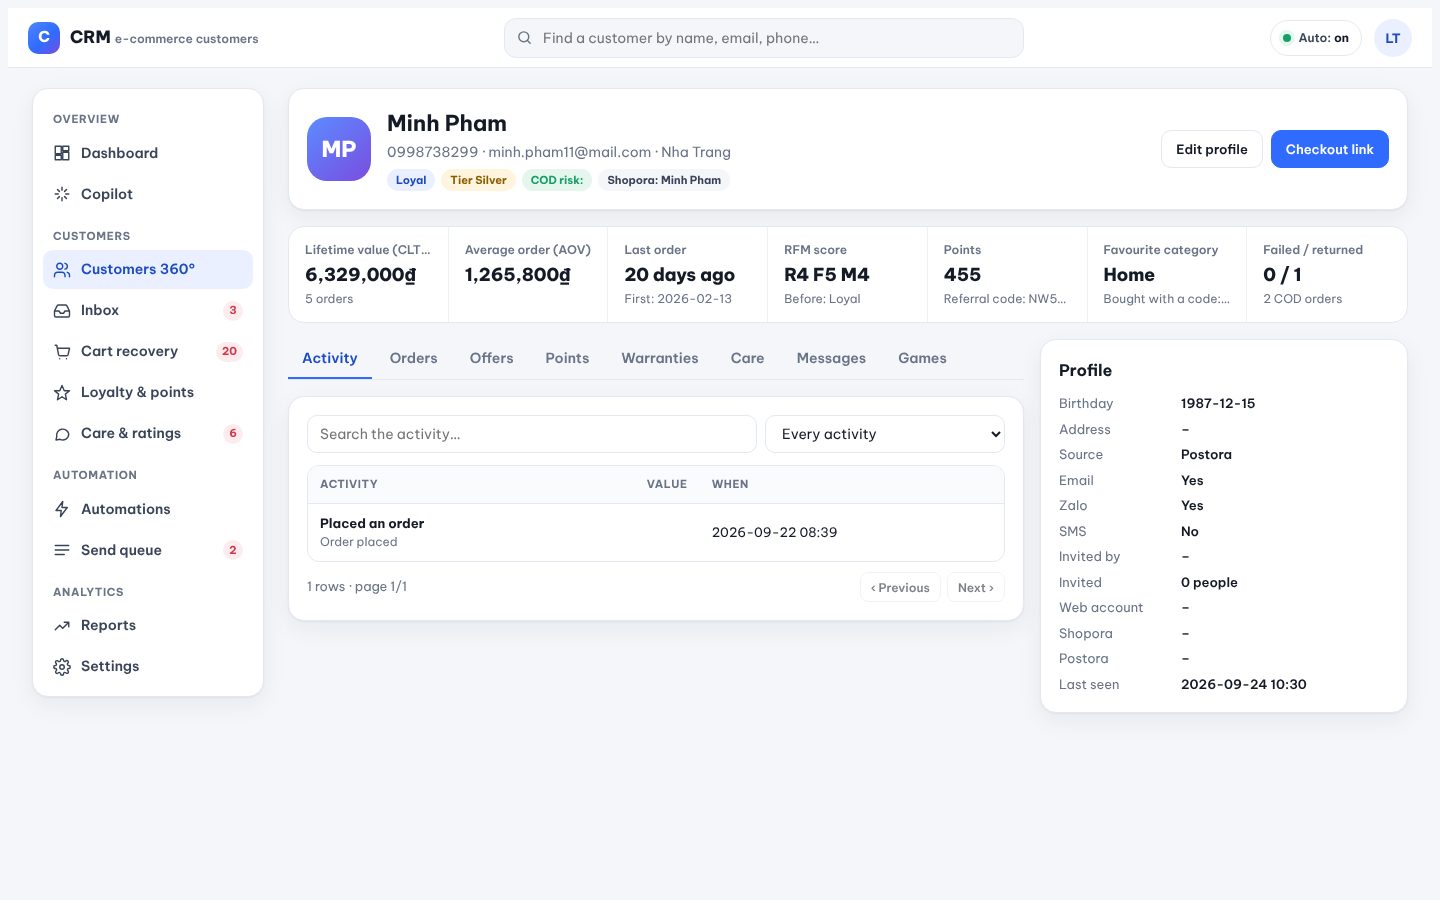
Click a customer to open the profile: lifetime value, average order, last order, RFM score, points, favourite category, failed/returned orders.
Tabs: Activity, Orders, Offers, Points, Warranties, Care, Messages, Games.
Quick actions: Checkout link, + Give a discount code, + Care ticket, + Add a warranty, adjust points, edit the profile.
Good to know: Points cannot be deleted; to correct them, add an adjustment on the profile.
northwind.shop/member/12
A customer profile: value, RFM, points and the full history in tabs.
Segments (RFM)
Where: Customers→Customers 360°→Every segment
Every customer is scored on Recency, Frequency and Money every day and sorted into Champions, Loyal, Potential, New, At risk, Deal hunters, Hibernating, Lost or No order yet.
Filter Customers 360° by segment to see who is in it.
The Dashboard shows how many are in each segment; Reports → RFM matrix shows how people moved this month.
Use segments in automations: e.g. Win back goes to At risk and Hibernating customers.
northwind.shop/members
Customers 360°: segment, tier, orders, spend, points and last order for everyone.
Facebook and Zalo inbox
Where: Customers→Inbox
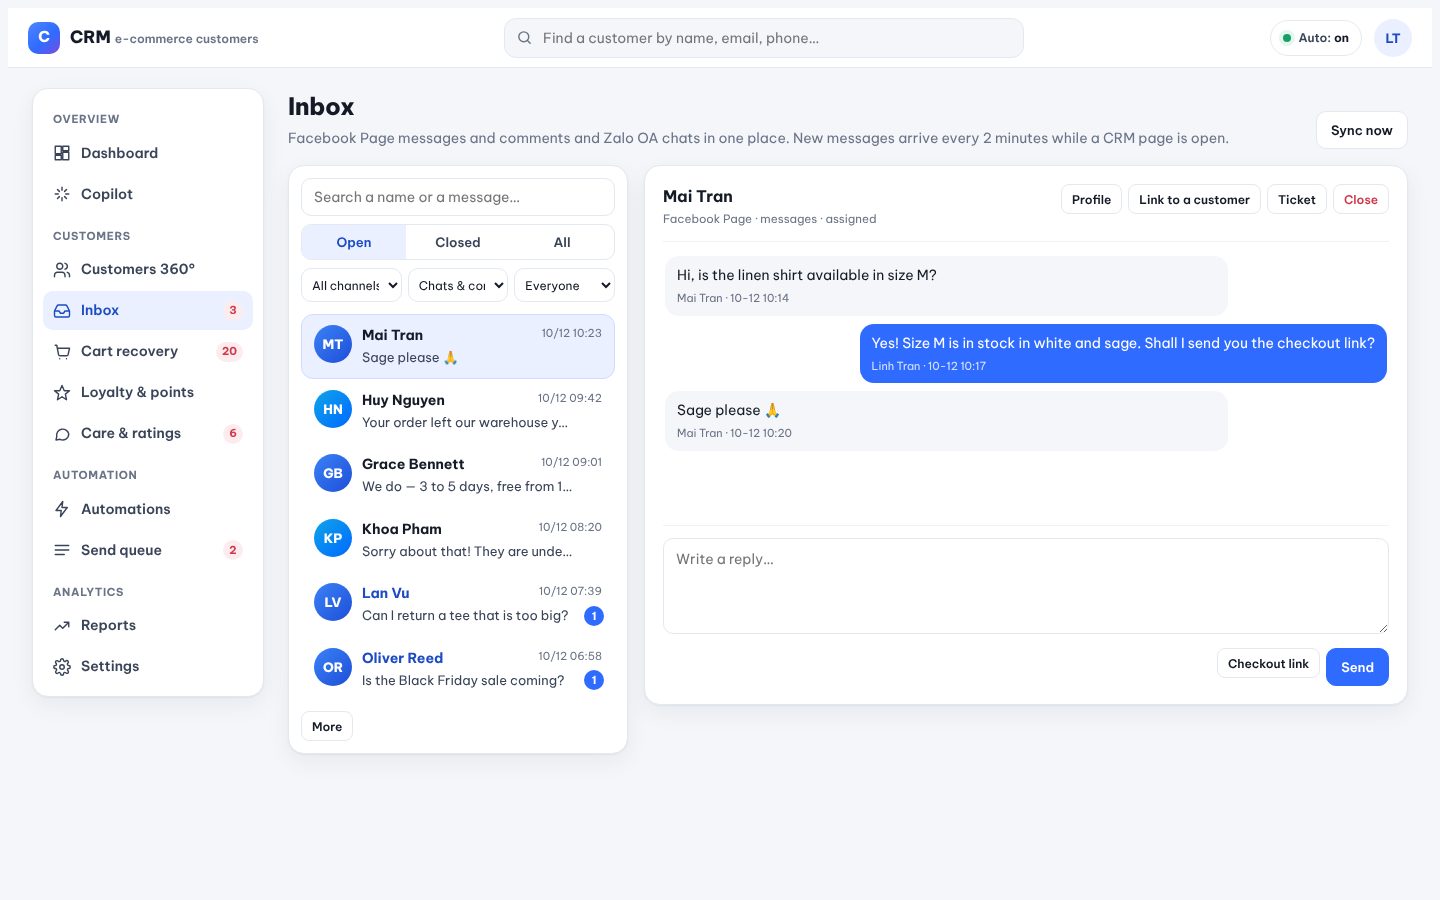
Facebook Page messages and comments and Zalo OA chats in one place: reply, send a checkout link with the live stock, open a ticket or link the person to a customer.
An admin connects the Facebook Page and the Zalo OA in Settings → Inbox.
Open Inbox; filter Open / Closed / All, by channel or by who is assigned.
Pick a conversation and reply. Checkout link picks a product and sends a link with the current stock.
Profile opens the customer; Ticket opens a care ticket; Close archives the chat.
Good to know: New messages arrive every 2 minutes while a CRM page is open (the server cannot call Facebook or Zalo itself).
northwind.shop/inbox
The inbox with a Facebook conversation open.
Automatic care
Cart recovery
Where: Customers→Cart recovery
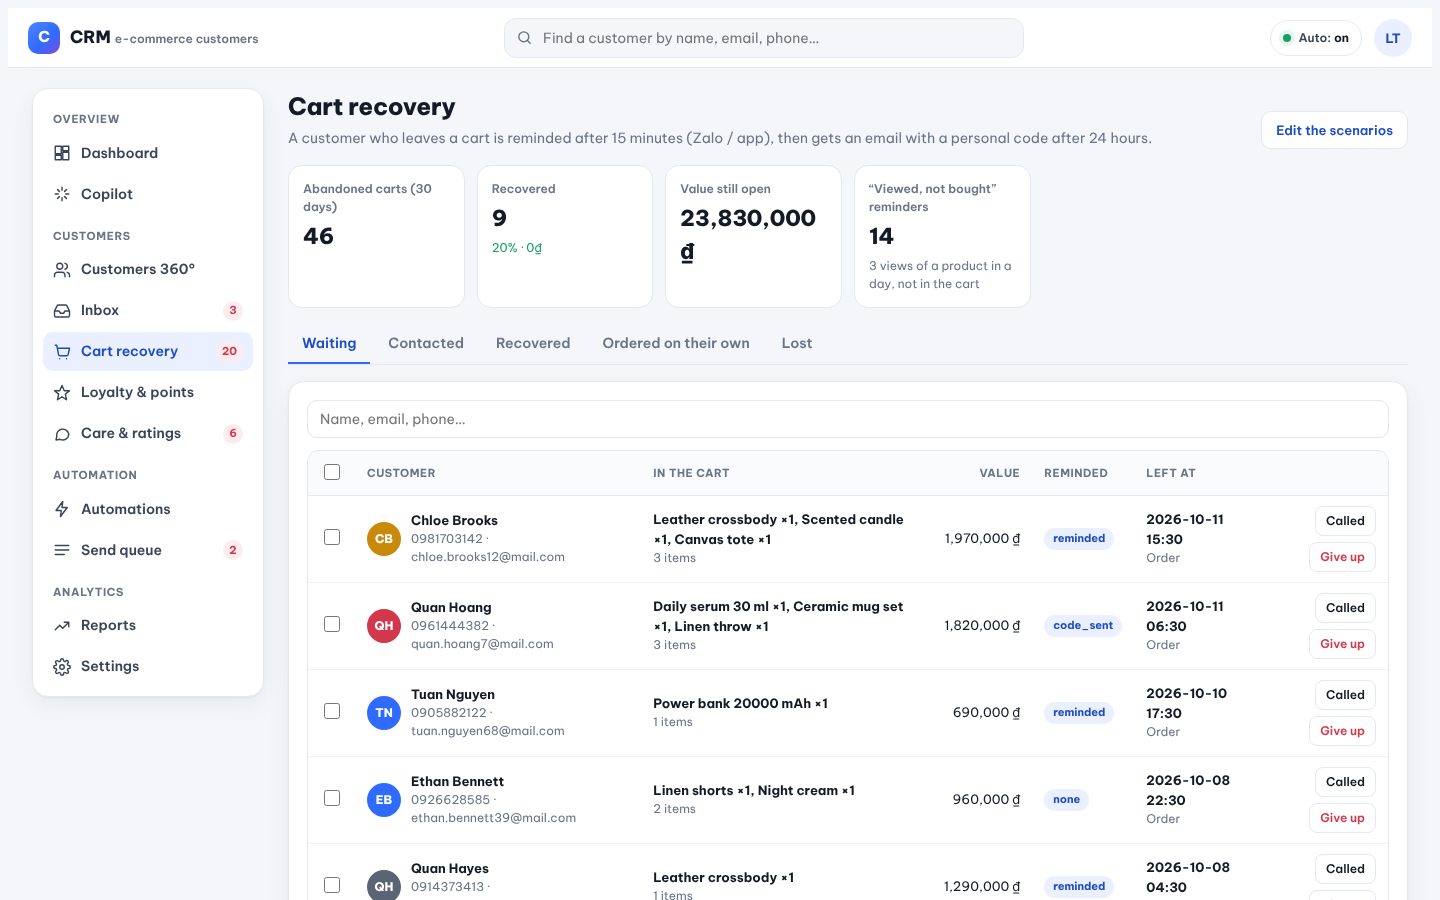
A customer who leaves a cart is reminded after 15 minutes (Zalo / app), then gets an email with a personal code after 24 hours.
Open Cart recovery: abandoned carts (30 days), recovered, value still open and “viewed, not bought” reminders.
Tabs: Waiting, Contacted, Recovered, Ordered on their own, Lost.
Called notes that you phoned; Give up stops the reminders for that cart.
Change the timing and the texts in Automations.
northwind.shop/recovery
Cart recovery: what is in each cart, its value and how far the reminders got.
Automation scenarios
Where: Automation→Automations
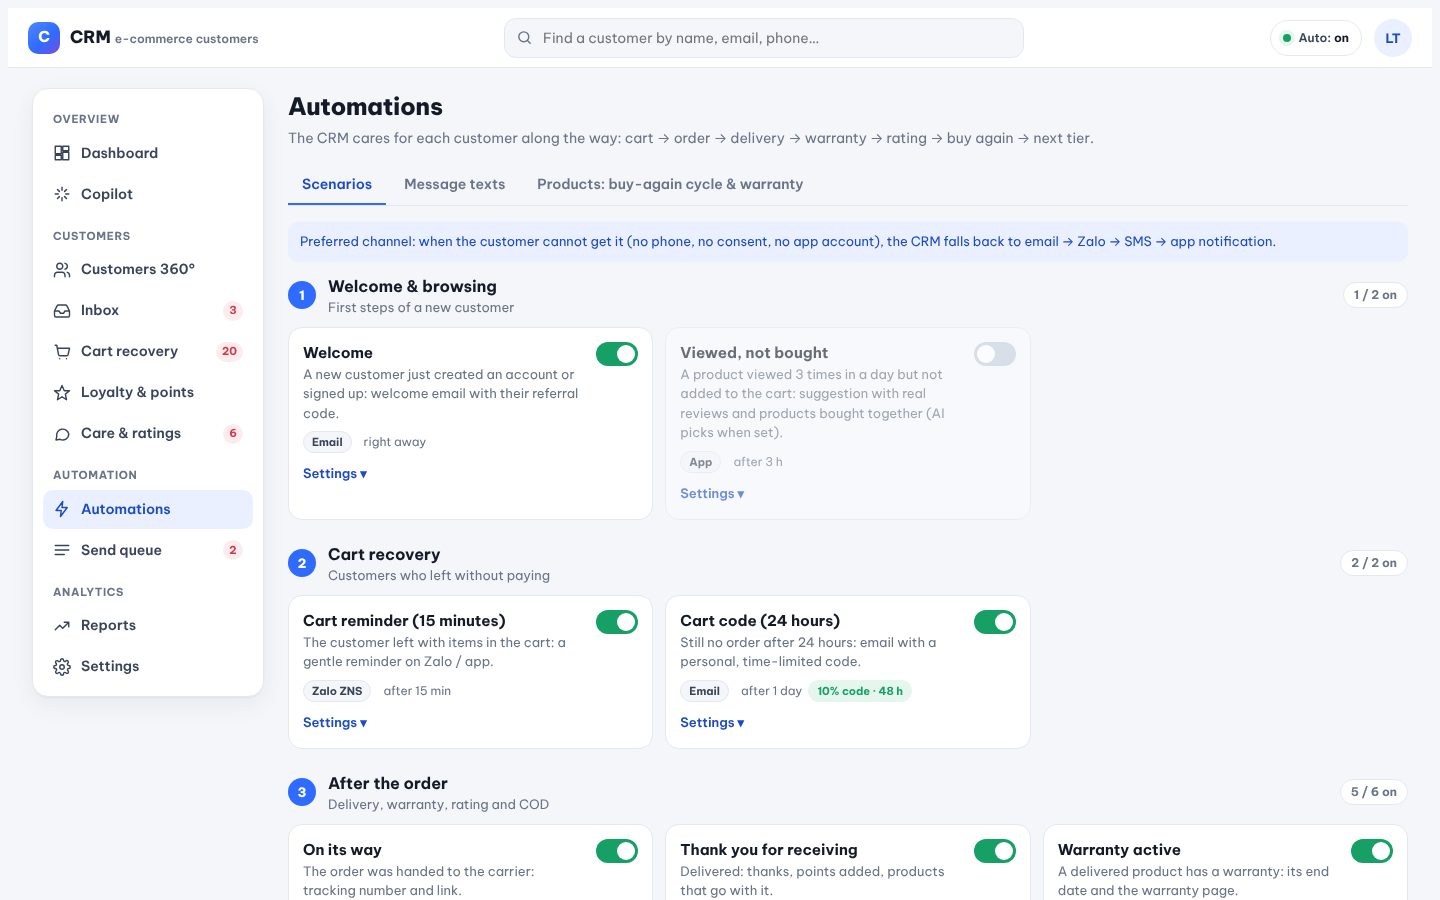
Ready scenarios for the whole journey: welcome, cart reminder, cart code, viewed-not-bought, buy again, on its way, thank you, warranty, rating, review invite, COD deposit, points expiring, win back, birthday, tier up, referral thanks.
Open Automations → Scenarios. Switch each scenario on or off.
Click Settings on a scenario: channel, delay, and a discount (percent and hours valid) if it sends one.
Set the preferred channel: when the customer cannot get it (no phone, no consent, no app account) the CRM falls back to email → Zalo → SMS → app.
northwind.shop/automations
Scenarios grouped by step of the journey, each with its switch and channel.
Write the message texts
Where: Automation→Automations→Message texts
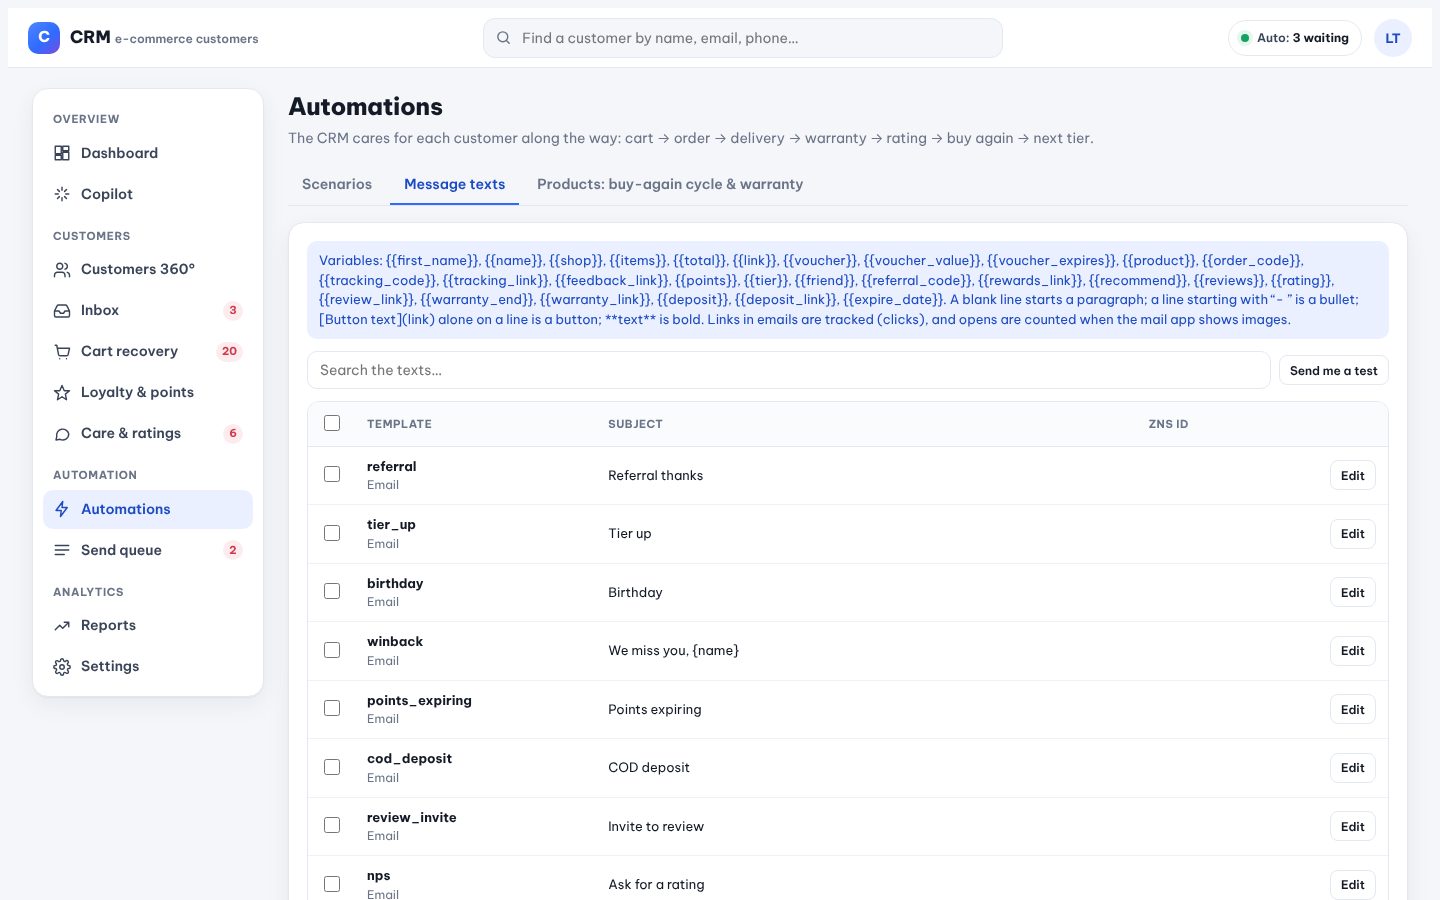
Every scenario has its own email, Zalo, SMS and app text.
Open Message texts and edit a template.
Formatting: a blank line starts a paragraph; a line starting with “- ” is a bullet; [Button text](link) alone on a line is a button; **text** is bold.
Variables such as {name}, {voucher}, {link} are filled for each customer.
Click Send a test to yourself before you switch the scenario on.
Good to know: Links in emails are tracked (clicks); opens are counted when the mail app shows images.
northwind.shop/automations
Message texts: one template per scenario and channel.
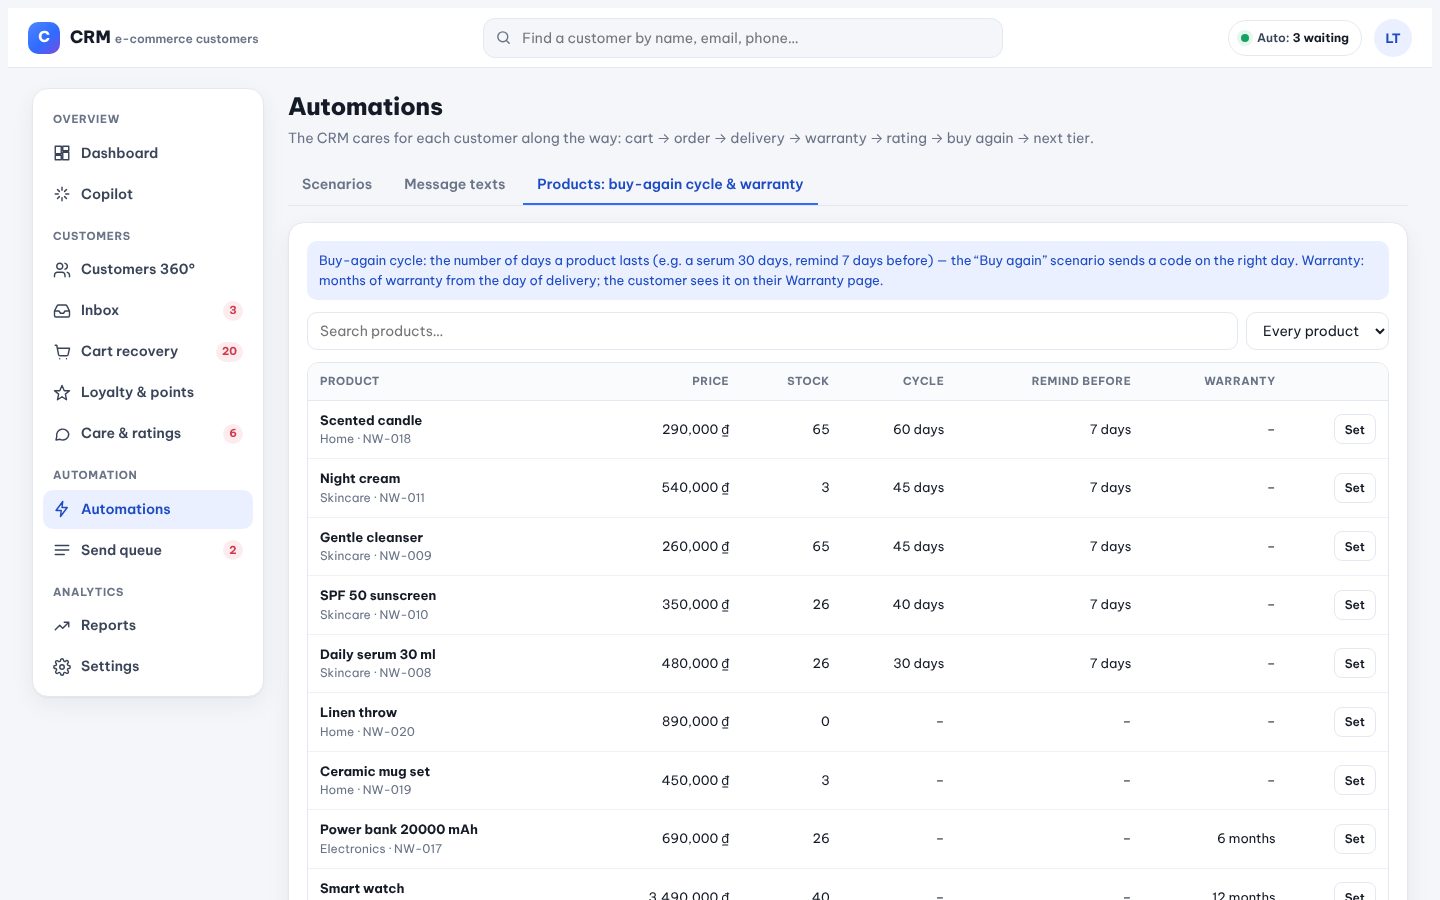
Tell the CRM how long a product lasts and how long it is guaranteed.
Open the Products tab.
Cycle: the days a product lasts (a serum 30 days) and Remind: how many days before — “Buy again” sends a code on the right day.
Warranty: months from the day of delivery; the customer sees it on their Warranty page.
northwind.shop/automations
Products with their buy-again cycle and warranty months.
The send queue
Where: Automation→Send queue
Every email, Zalo message, SMS and app notification waiting to go out, with what happened to it.
Open Send queue: waiting, sent today, failed and the last engine run.
Filter by status, channel or scenario; search a reference or an error.
Failures are retried after 10, 20 and 40 minutes; after three tries the message is failed — fix the channel settings and click send again.
Run the engine now and Send the queue now do the next minute's work at once.
Good to know: To let the server send email by itself: Settings → Email → Platform mail.
northwind.shop/queue
The send queue: scenario, channel, time, status, opened and clicked.
Care tickets, ratings and COD holds
Where: Customers→Care & ratings
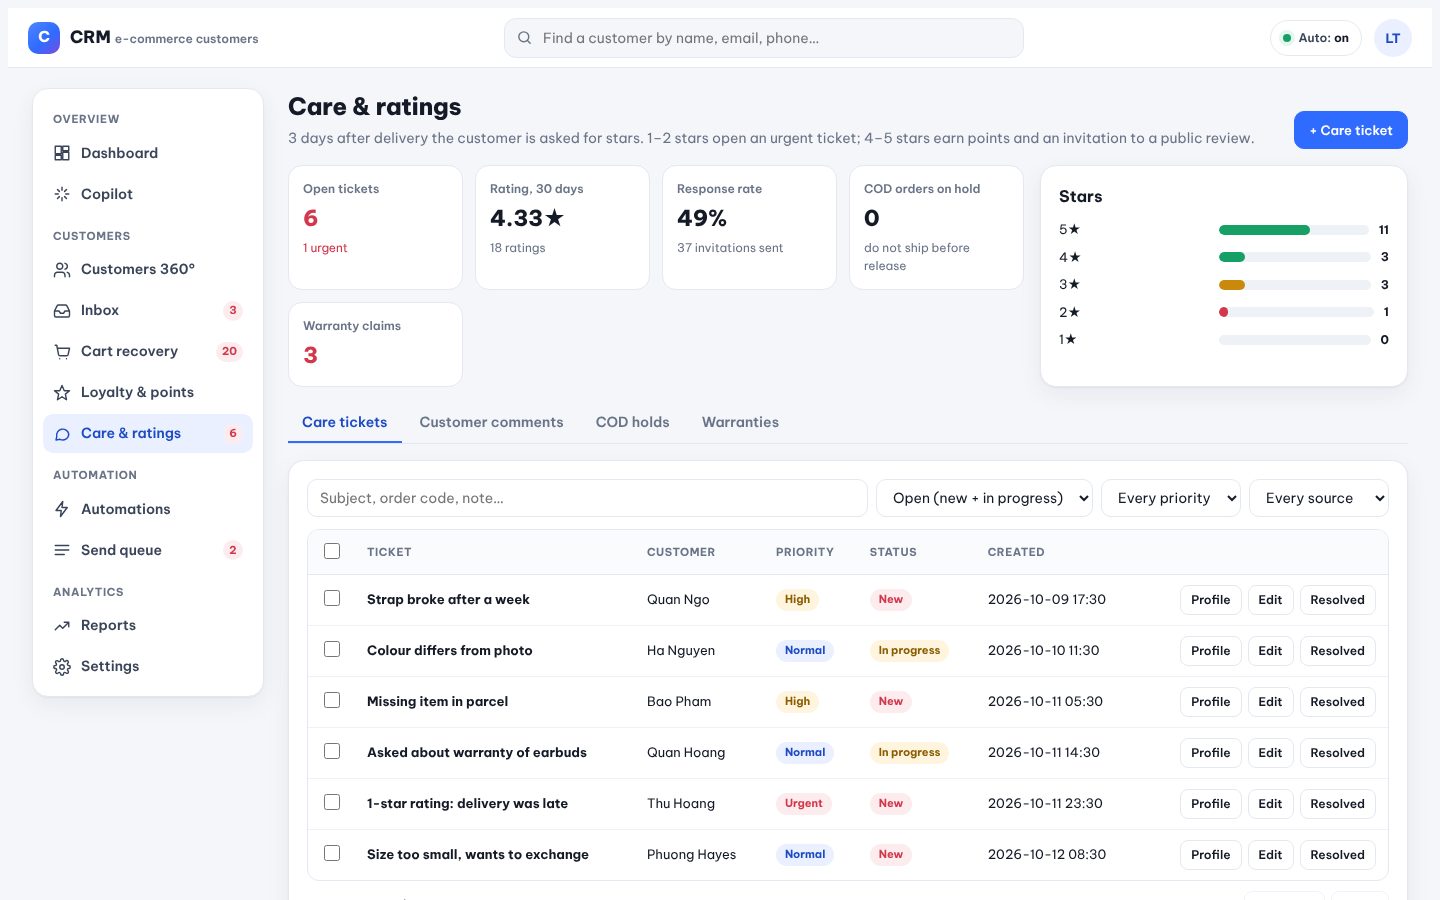
3 days after delivery the customer is asked for stars. 1–2 stars open an urgent ticket; 4–5 stars earn points and an invitation to a public review. Cash-on-delivery orders of risky customers wait for a deposit.
Open Care & ratings: open tickets, rating over 30 days, response rate, COD orders on hold, warranty claims.
Care tickets: call the customer, add a note, mark resolved.
Customer comments: every rating with its comment.
COD holds: when the deposit is in the bank (or you decide to ship anyway), release the order, then ship it in the shop.
northwind.shop/care
Care & ratings: tickets by priority, stars over 30 days.
Loyalty
Tiers, points and rewards
Where: Customers→Loyalty & points
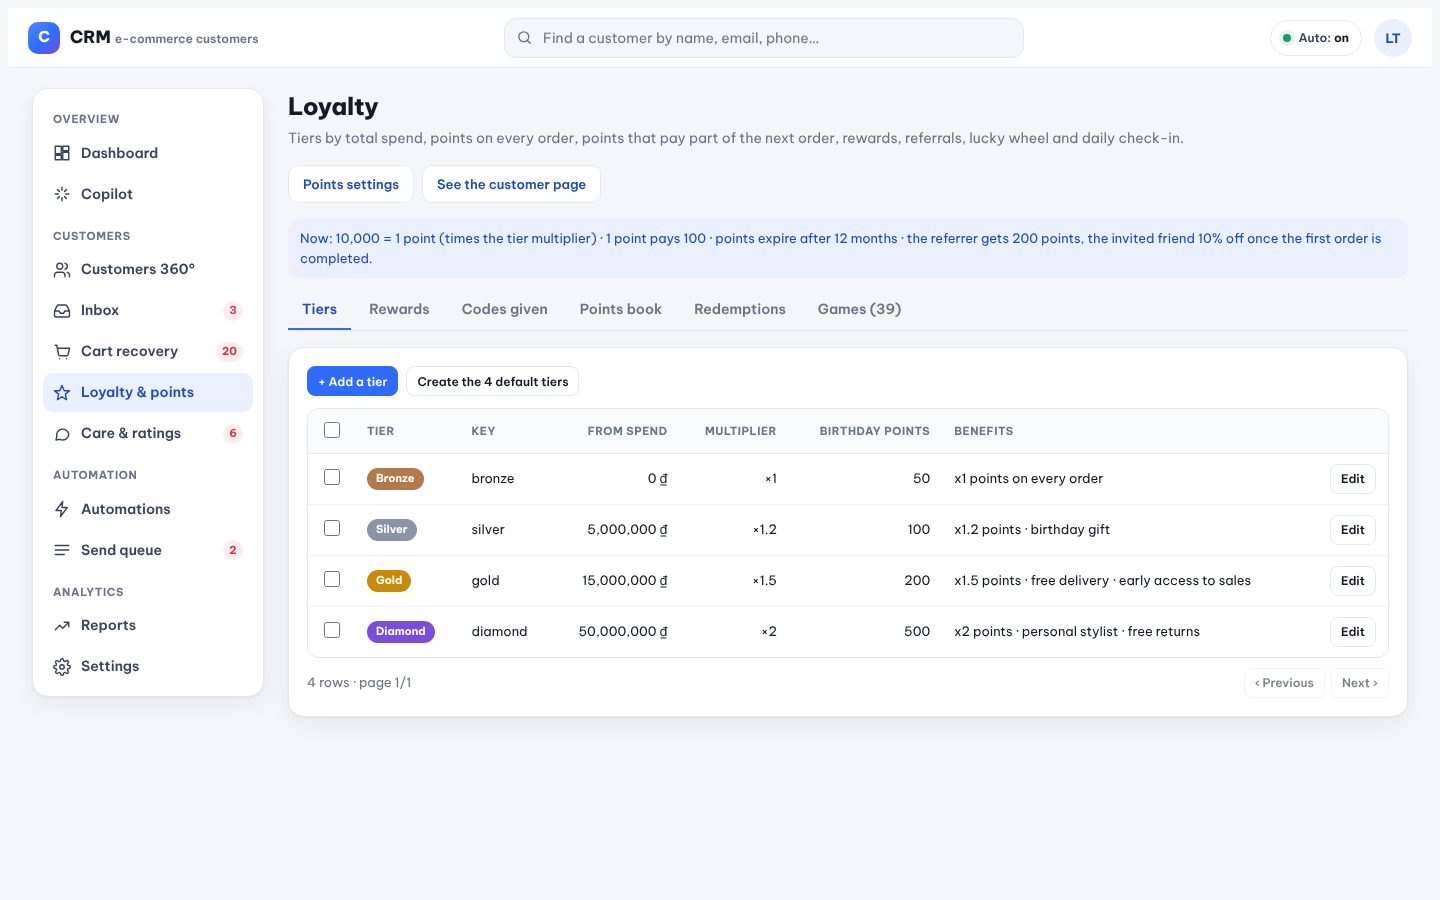
Tiers by total spend (Bronze 0, Silver 5 million, Gold 15 million, Diamond 50 million by default), points on every order, points that pay part of the next order, rewards and referrals.
Open Loyalty & points. Click Create the 4 default tiers to edit names, spend, point multiplier and birthday points.
Points settings: how much spend earns 1 point, what 1 point pays, when points expire.
Rewards: add rewards and their price in points.
Customers see their points and redeem them on /rewards.
northwind.shop/loyalty
Membership tiers with spend, multiplier, birthday points and benefits.
The member page your customers see
Where: Website→/rewards
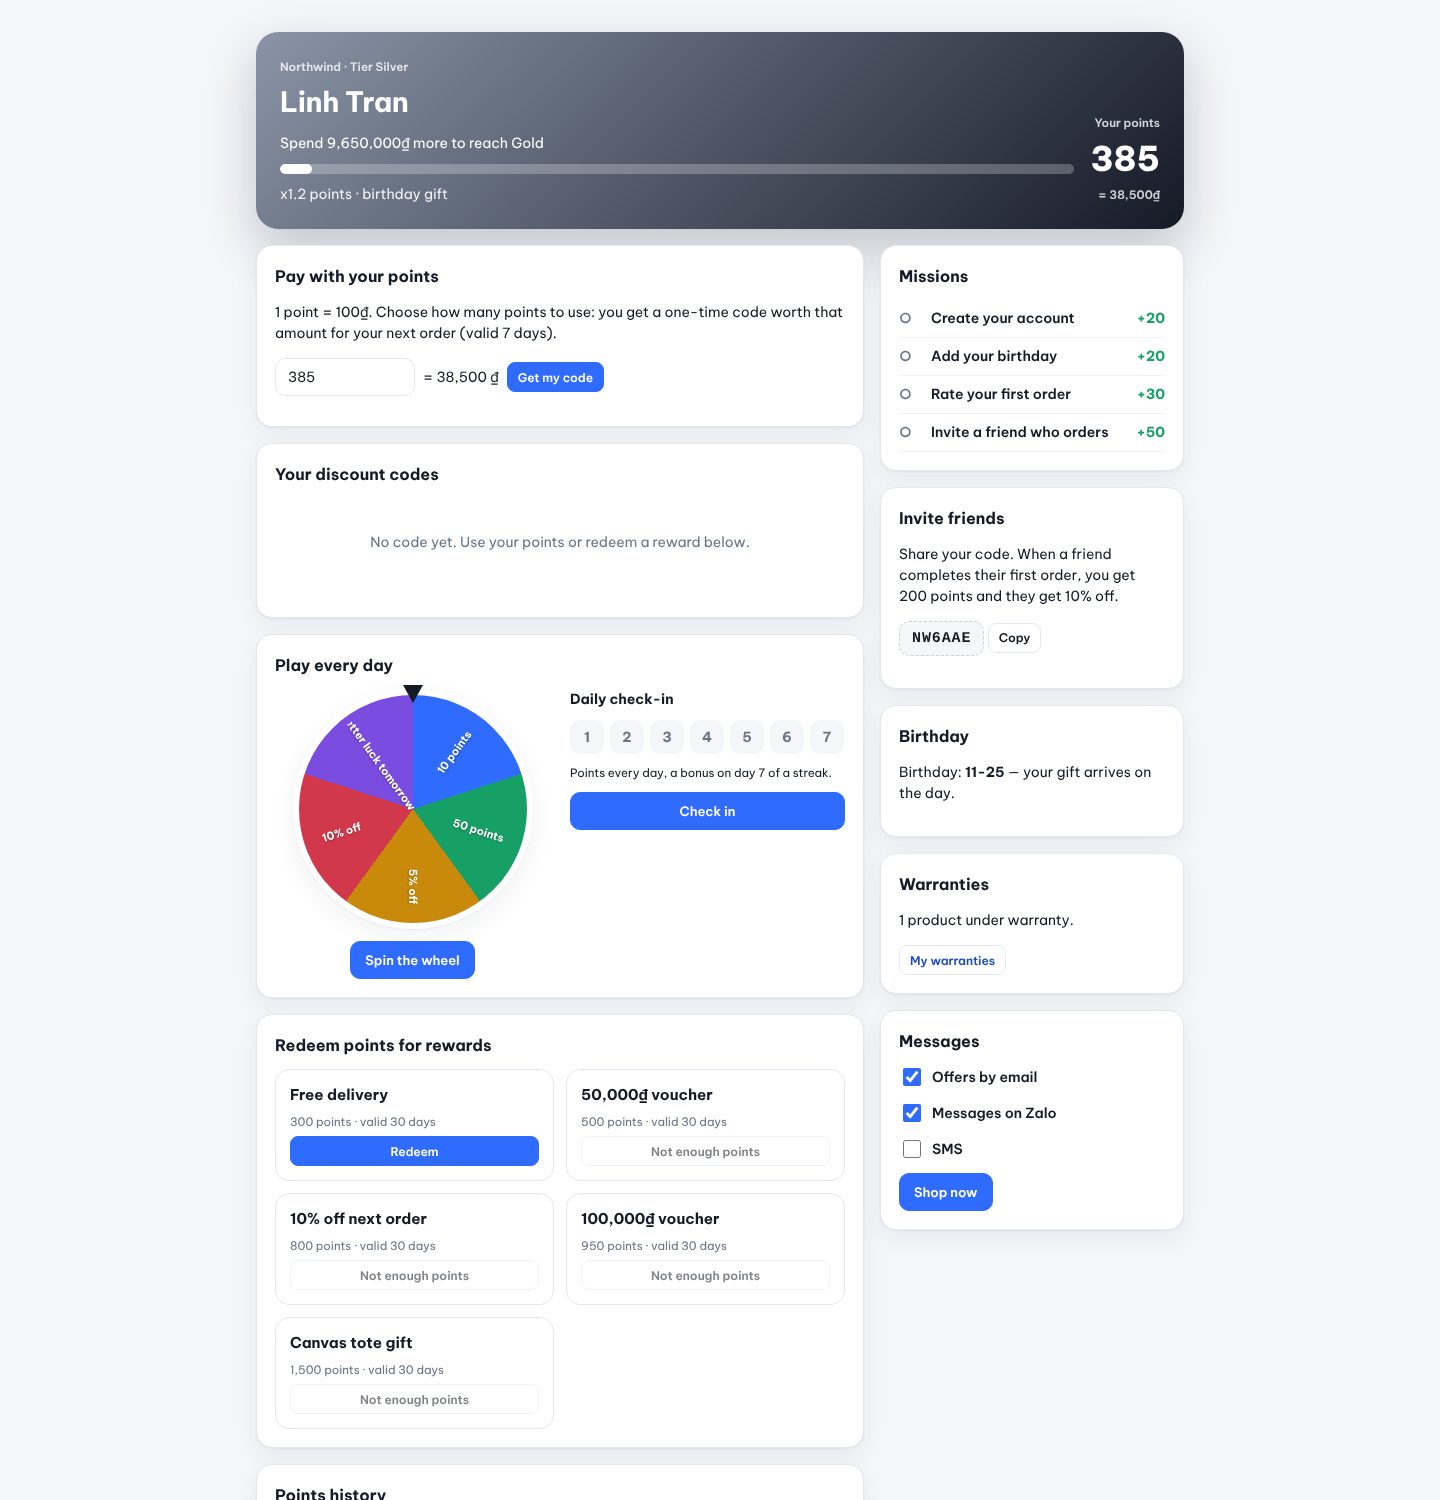
Each customer has a page with their tier, points, codes, missions, referral code, daily check-in and lucky wheel.
Link /rewards from the shop menu or the account page.
Customers turn points into a one-time code (“Pay with your points”), redeem rewards, invite friends and play every day.
Prizes, chances, check-in points and missions are set in Settings → Games.
Good to know: The prize is drawn on the server, never in the customer's browser.
northwind.shop/rewards
The member page: tier progress, points, missions, referral and the lucky wheel.
Lucky wheel, check-in and missions
Where: Customers→Loyalty & points→Games
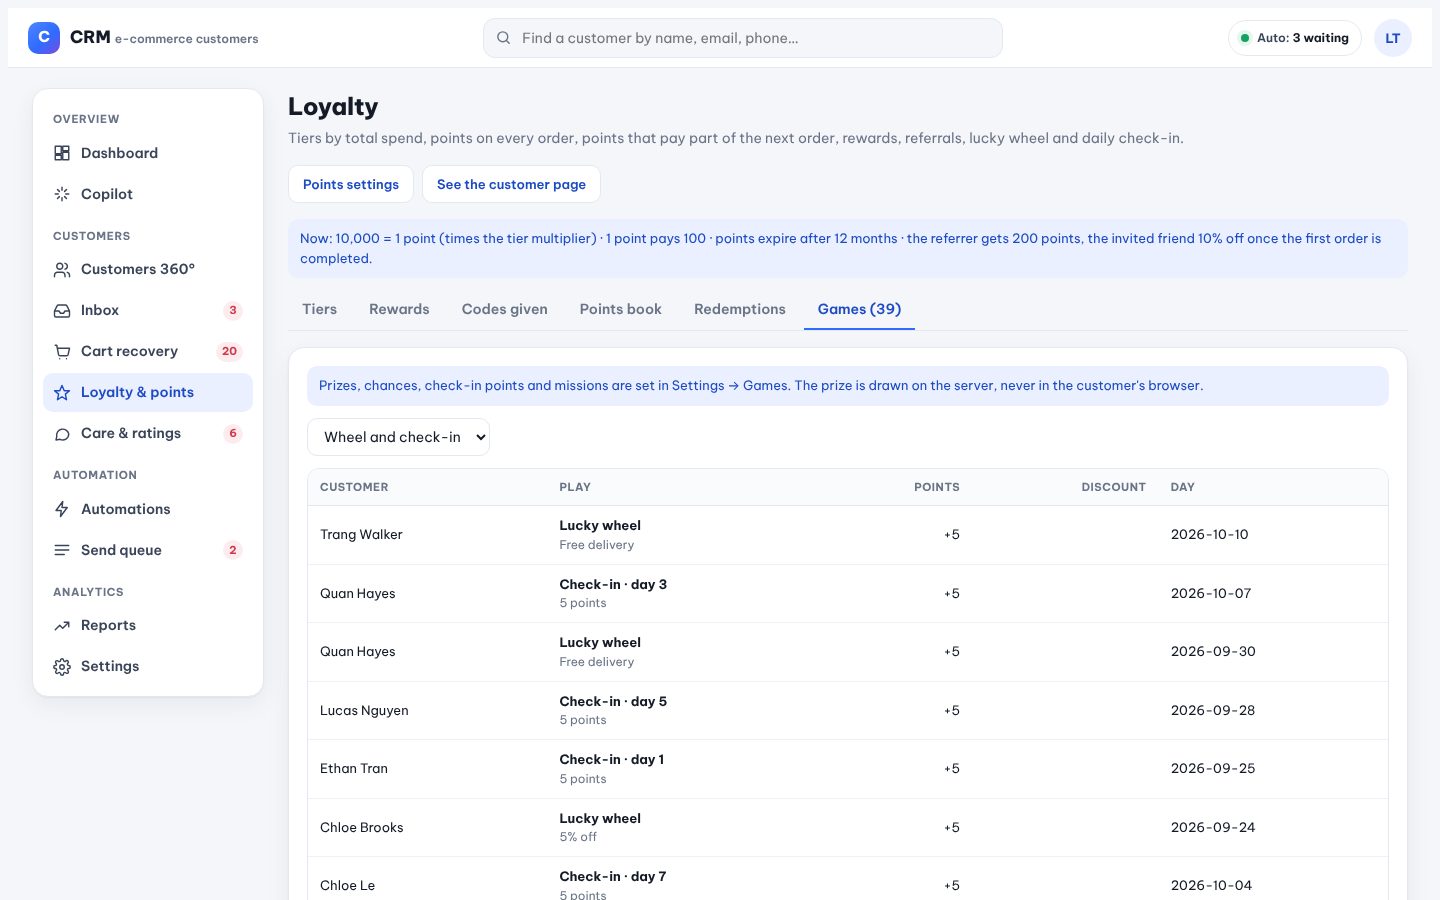
A lucky wheel, a daily check-in (bonus on day 7 of a streak) and missions (add a birthday, write a review, invite a friend).
Set prizes, chances, check-in points and missions in Settings → Games.
See every play in Loyalty → Games.
northwind.shop/loyalty
Every spin and check-in with its prize.
Warranties
Where: Customers 360°→profile→+ Add a warranty→/warranty
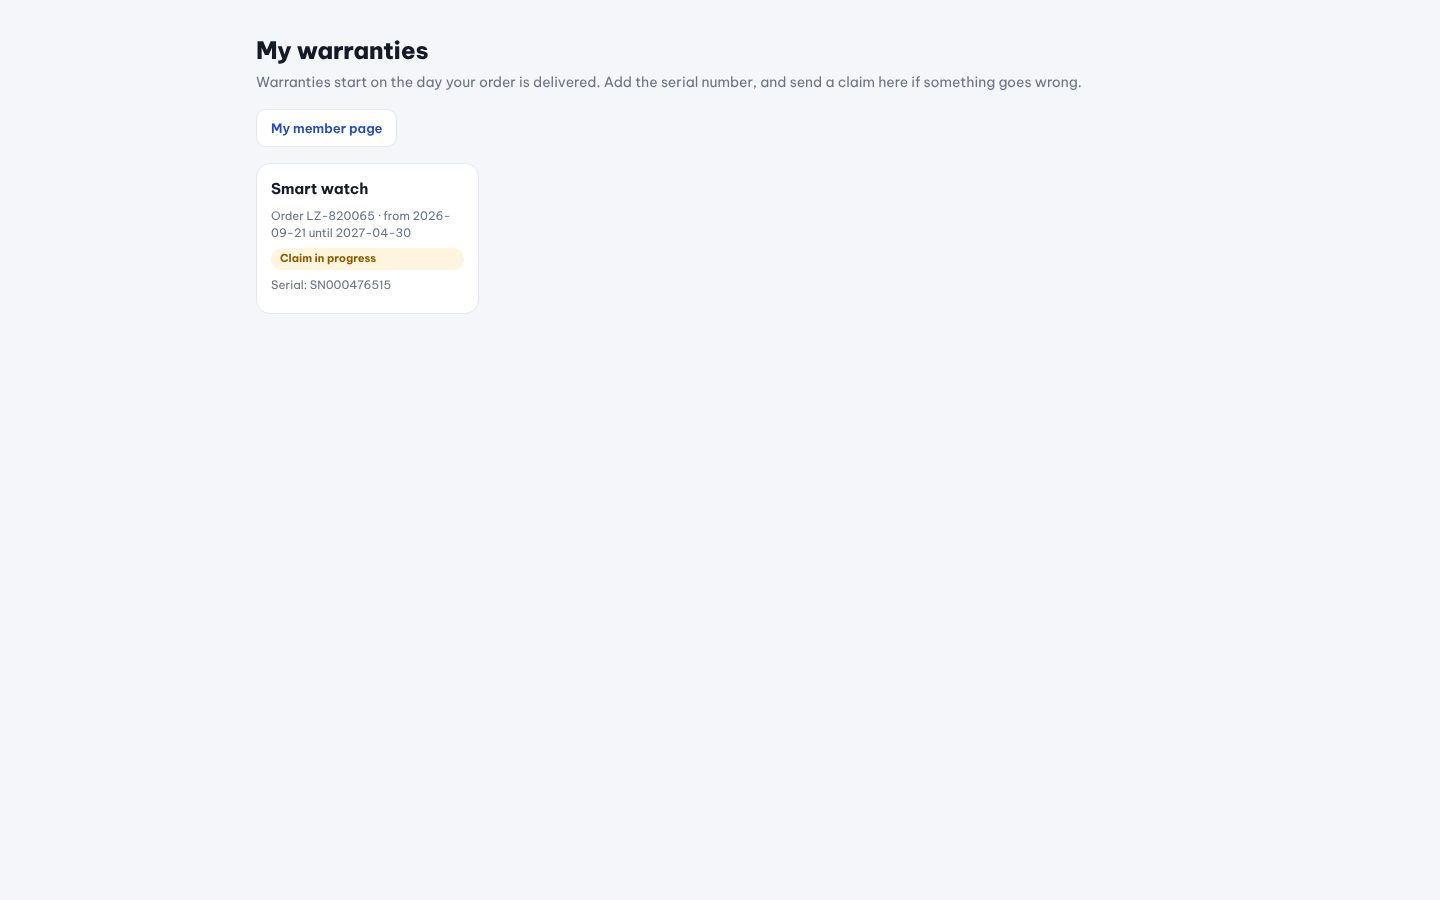
Warranties start on the day of delivery; customers add the serial number and send a claim from their page.
Set the warranty months per product (Automations → Products).
Warranties are created when the order is delivered; add one by hand from the profile if needed.
Customers open /warranty, add the serial and send a claim — it becomes a care ticket.
northwind.shop/warranty
The customer's warranty page.
Reports and settings
Reports
Where: Analytics→Reports
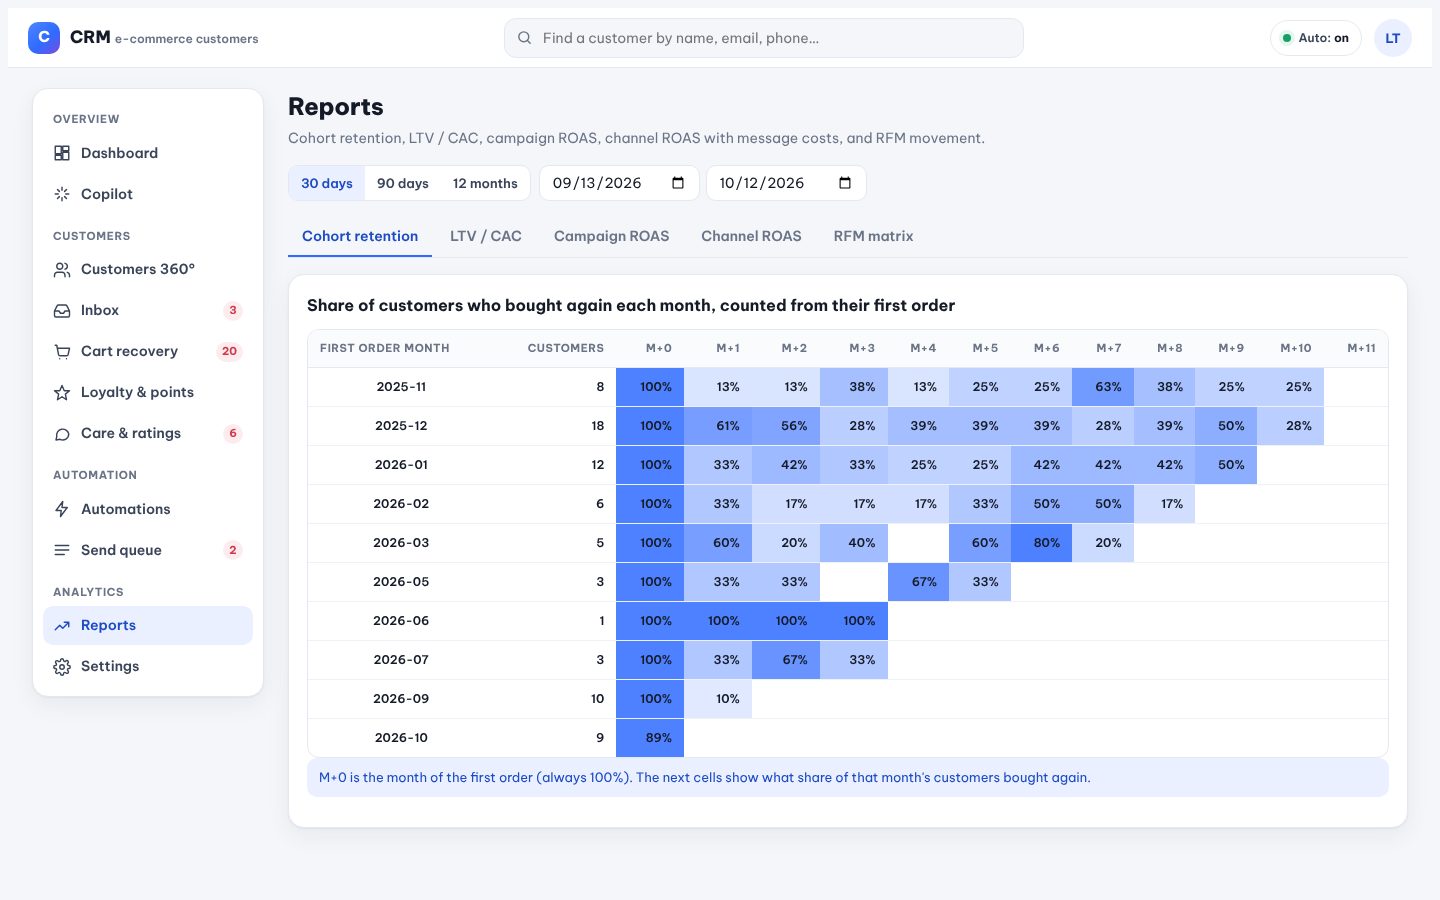
Cohort retention, LTV / CAC, campaign ROAS, channel ROAS with message costs, and RFM movement.
Pick a period.
Cohort retention: of the customers who bought for the first time in a month, the share who bought again in each later month.
LTV / CAC: value of new customers against what it cost to get them — type your marketing spend in Settings → Costs.
Channel ROAS: messages, opens, clicks, orders and revenue per channel, against the cost of the messages.
RFM matrix: how many customers sit in each R×F cell and who moved this month.
northwind.shop/reports
Cohort retention: each row is a first-order month.
Connect email, Zalo, SMS, marketplaces and carriers
Where: Settings
Connect the CRM to the services it sends through and reads from.
Email: Platform mail (the server sends), or Resend / SendGrid / Brevo with an API key and a verified sender.
Zalo ZNS: the OA access token; each template needs its approved ZNS template ID.
SMS: eSMS, SpeedSMS or Twilio.
Marketplaces: keys for Shopee, Lazada and TikTok Shop — orders and customers are pulled every 10 minutes.