Website, booking, front desk, doctor desk, catalogue, money, Copilot, languages and currencies — with screenshots of every screen. 23 guides — type in the search box to filter.
No guide matches. Try another word, like “booking”, “reminder” or “language”.
Getting started
Install on your website
Where: Platform admin→Import project
Each product is a set of text files in the platform's block format. Installed on the same website, the three share clients, appointments and payments.
Sign in with the platform's super admin account.
Import the files of the zip in the order of their names (00-shared first, 70-languages last).
Open /staff and sign in; the menu on the left shows only what your role may use.
Good to know: Installing all three? Clinic first, then the Booking CRM, then Marketing — the later ones read the clinic's data.
Try it with demo data
Where: System→Demo data & reset
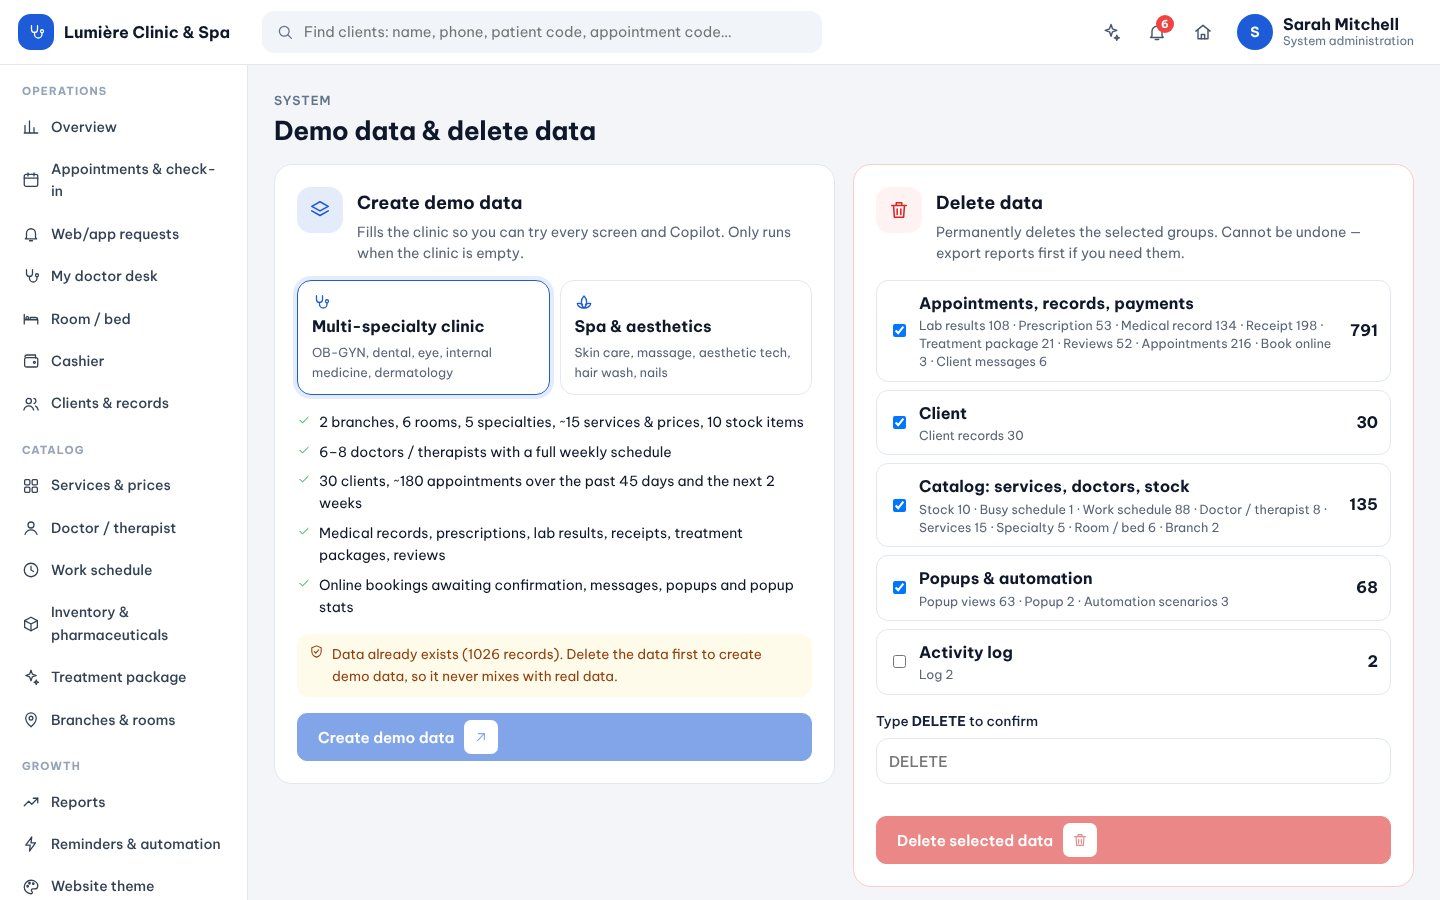
Fill an empty clinic with 2 branches, 6 rooms, 15 services, 8 doctors with schedules, 30 clients, about 200 appointments, records, receipts, packages and reviews.
Open Demo data & reset and choose Multi-specialty clinic or Spa & aesthetics.
Click Create demo data and keep the page open for about a minute.
When you are done, tick the groups under Delete data, type DELETE and confirm.
Good to know: Demo data is only created when the clinic is empty.
lumiere.clinic/tools
Demo data and delete data.
Read the dashboard
Where: Operations→Overview
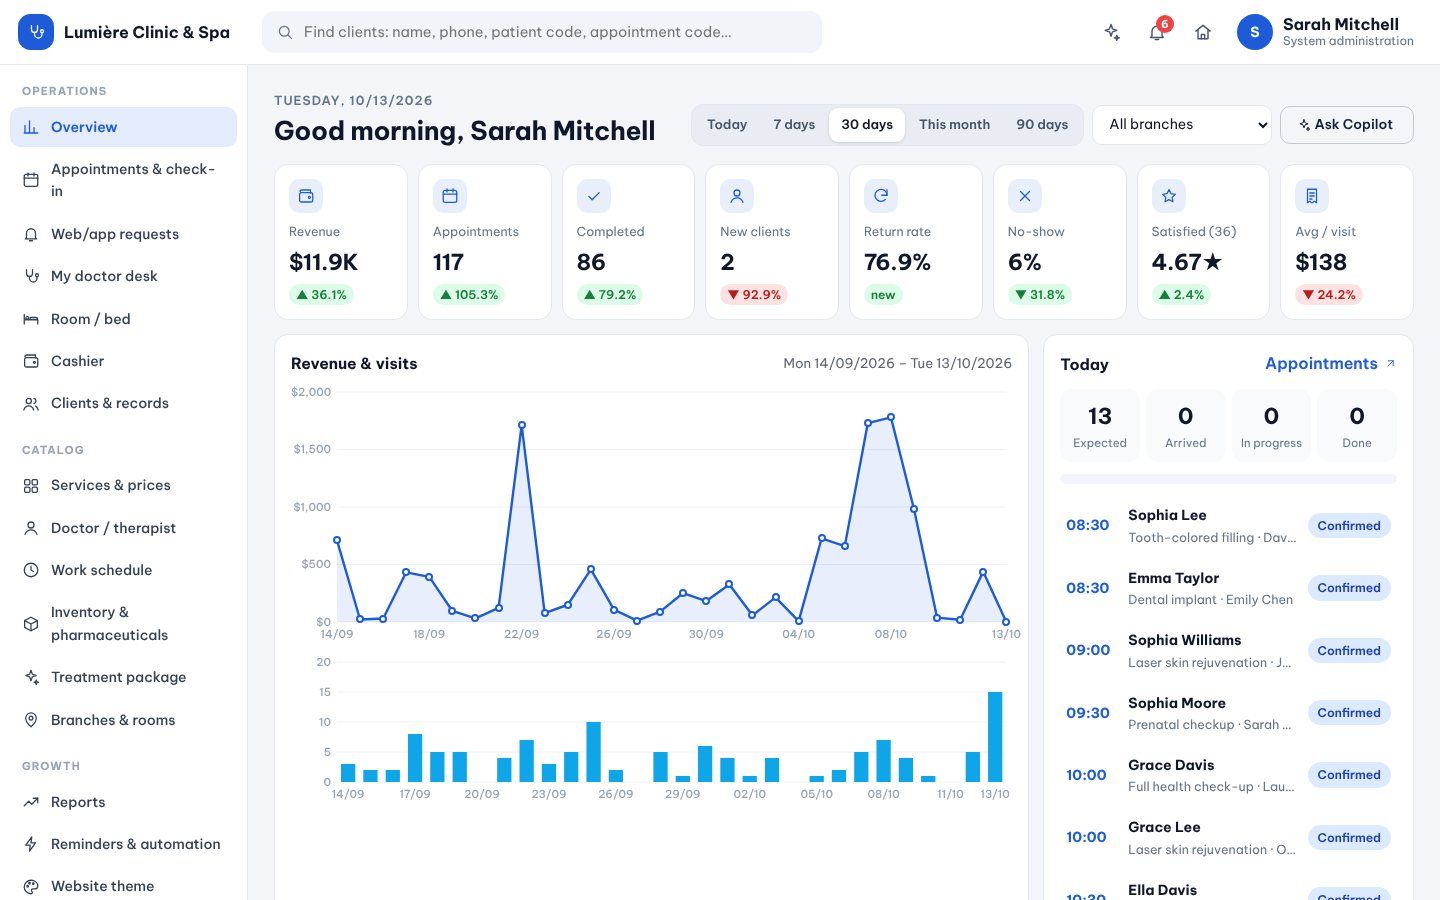
Revenue, appointments, completed visits, new clients, return rate, no-shows, satisfaction and average per visit — against the period before.
Pick Today, 7 days, 30 days, This month or 90 days, and a branch.
Read the arrows: green is better than the period before.
The right column lists today's appointments; Ask Copilot explains any number.
lumiere.clinic/dashboard
The dashboard with 30 days of demo data.
Talk to Copilot
Where: System→Copilot AI
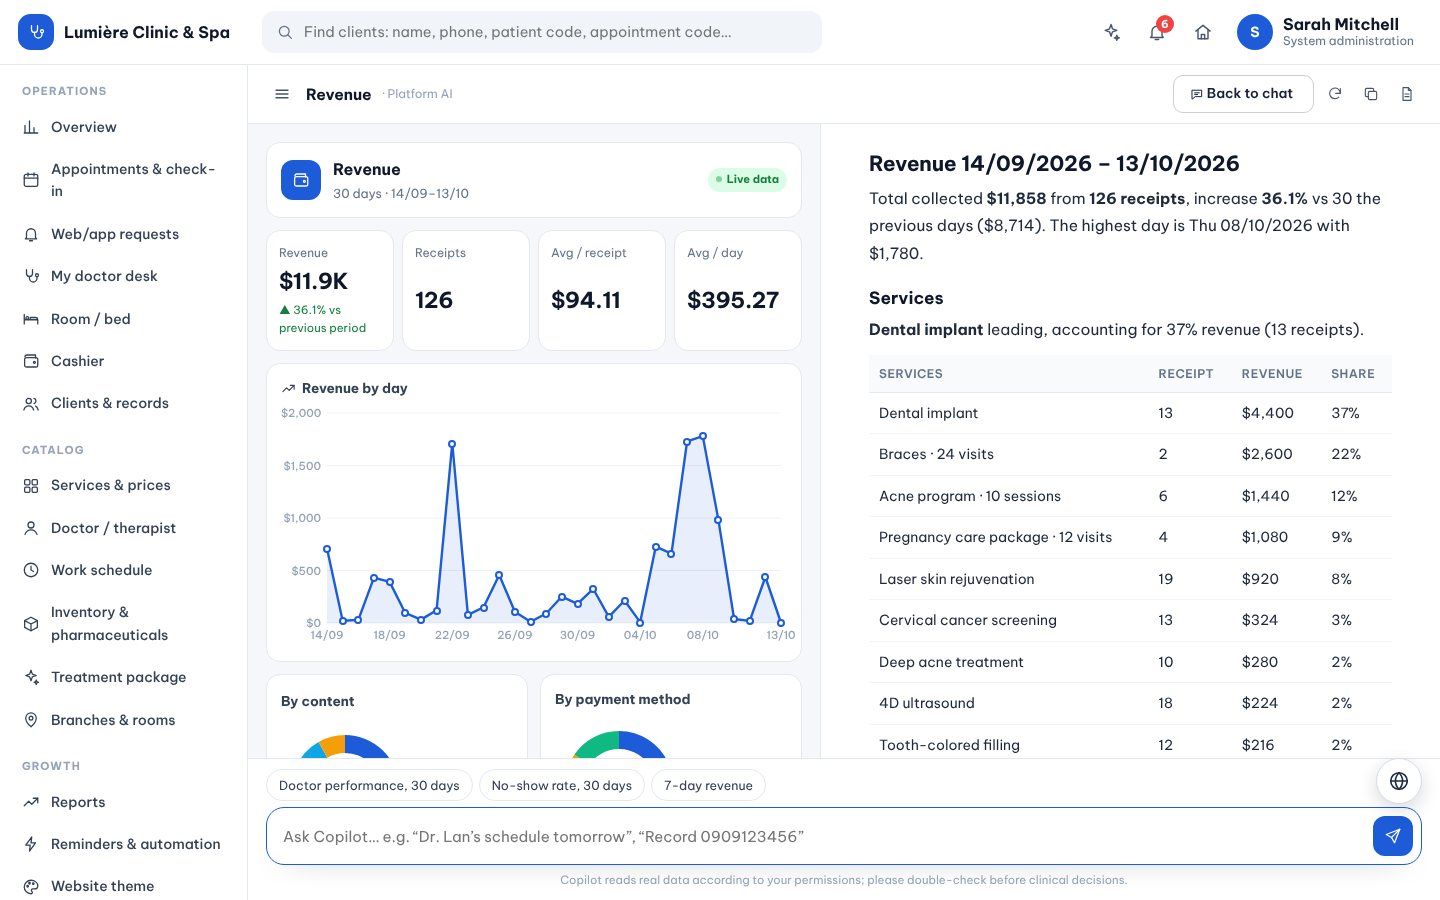
Ask in plain words — “today's summary”, “free slots tomorrow”, “revenue last 30 days”, “record 0909…”. Long answers open a report: chart on the left, reading pane on the right.
Open Copilot and type, or click a suggestion.
Clear questions are answered even without AI; others use the platform AI or your own key (Settings → AI).
Ask it to change the website: “switch to the Day Spa theme”, “main colour #1d5bd8”, “hotline 1900…”. It shows the change first.
lumiere.clinic/copilot
“Revenue last 30 days”: chart, services and payment methods.
Website
Change the theme
Where: Growth→Website theme
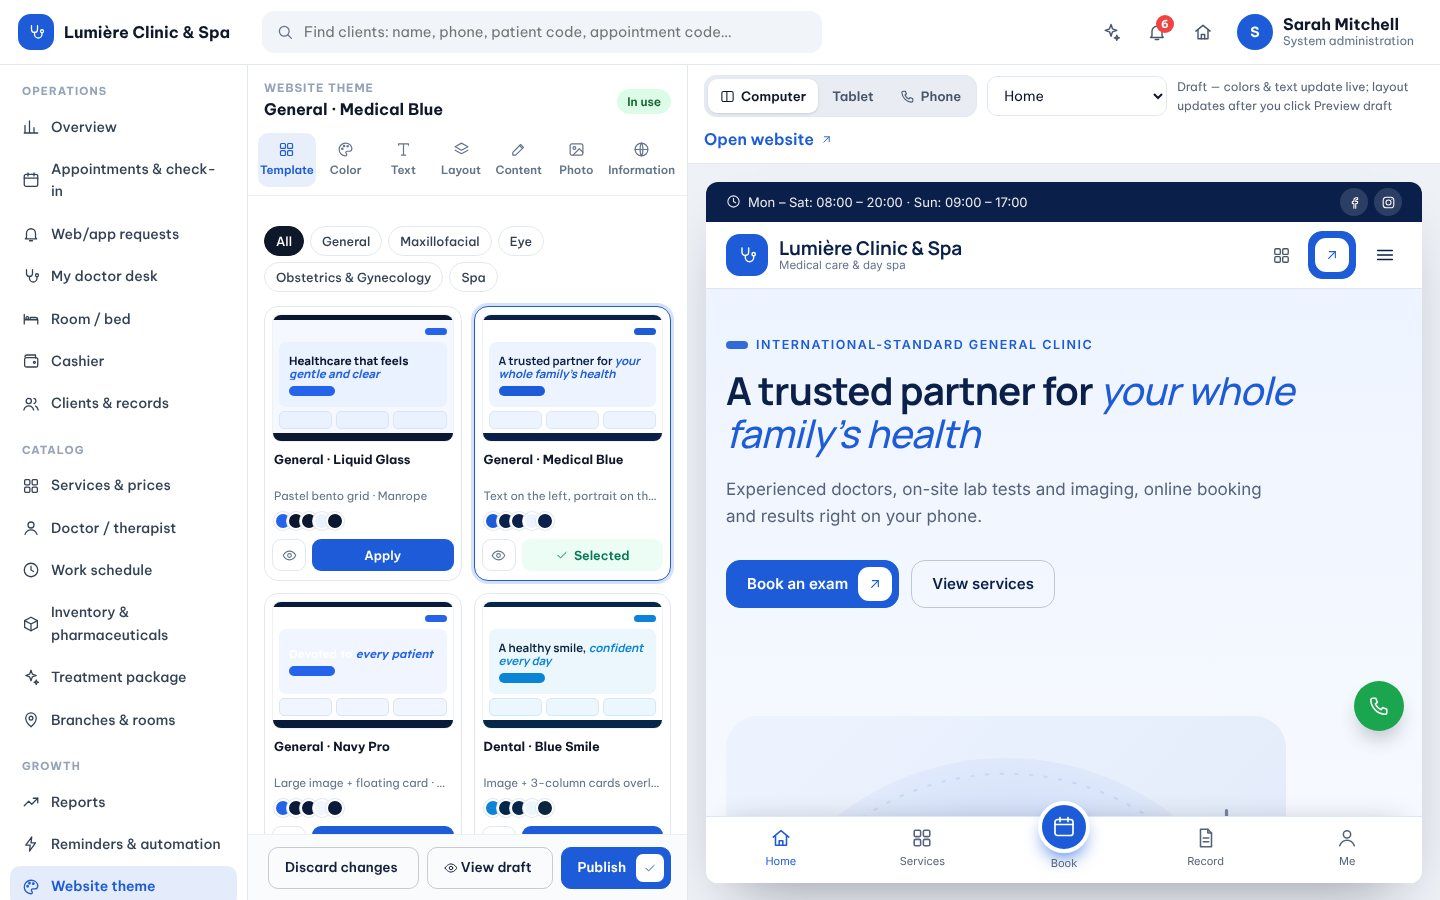
Pick one of 35 designs — general, dental, eye care, women & baby, spa & aesthetics — filled with your own services and doctors.
Open Website theme, tab Template; filter by specialty.
Click a theme to preview it on the right, as computer, tablet or phone.
Change Color, Text, Layout, Content, Photo and Information if you like, then View draft.
Publish. Until then visitors see nothing change; Discard changes goes back.
Good to know: See all 35 with sample data on the Themes page.
lumiere.clinic/storefront
Website theme: templates on the left, live preview on the right.
Website popups
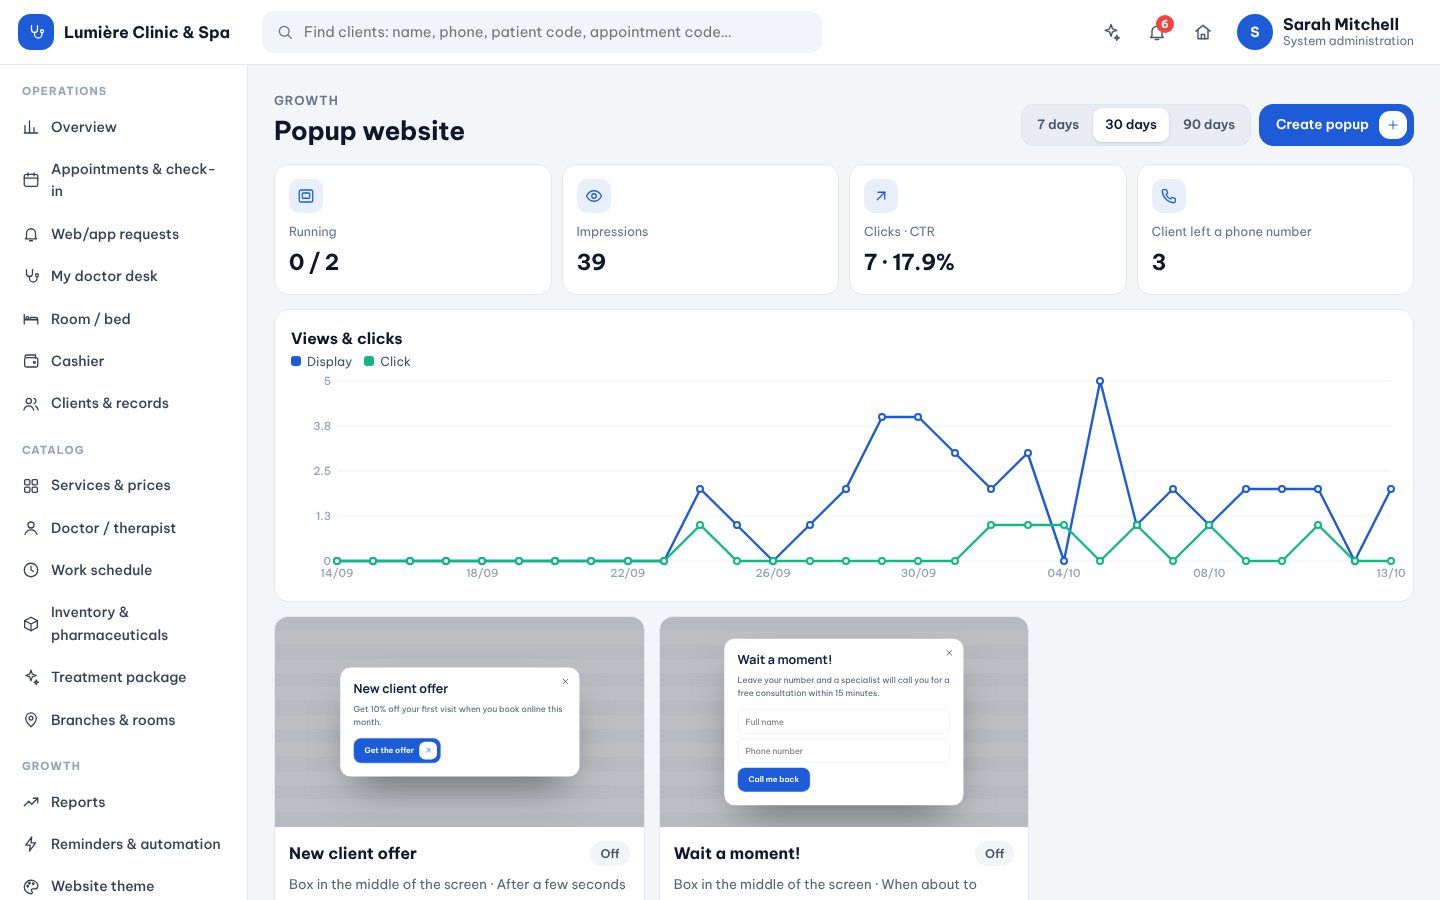
Where: Growth→Popups
Offers, announcements and a quick call-back form, with views, clicks and phone numbers left.
Open Popups → Create popup: title, text, button, image.
Choose when it shows (delay, scroll, exit), on which pages and how often.
Follow views, clicks and leads for 7, 30 or 90 days.
lumiere.clinic/popups
Popup performance.
Design the client app
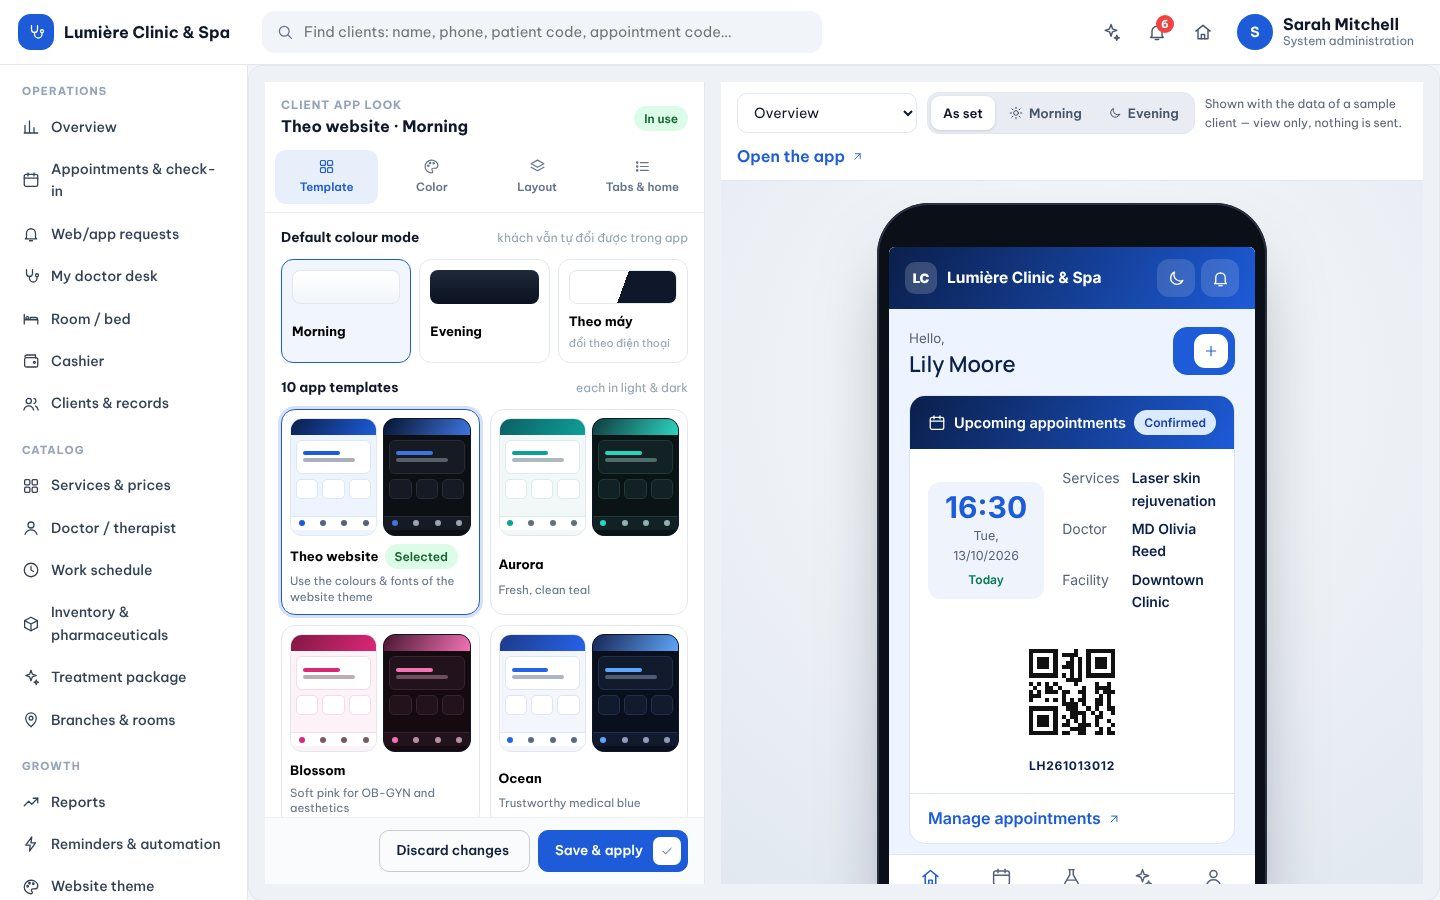
Where: Growth→App design
The client app shows the next appointment with its QR code, results, prescriptions, packages and member tier.
Open App design and pick one of 10 templates, light or dark.
Change colours, card style, tab bar and home blocks; check the phone preview.
Save & apply.
lumiere.clinic/app-design
App design with the live phone preview.
Booking & front desk
How online booking works
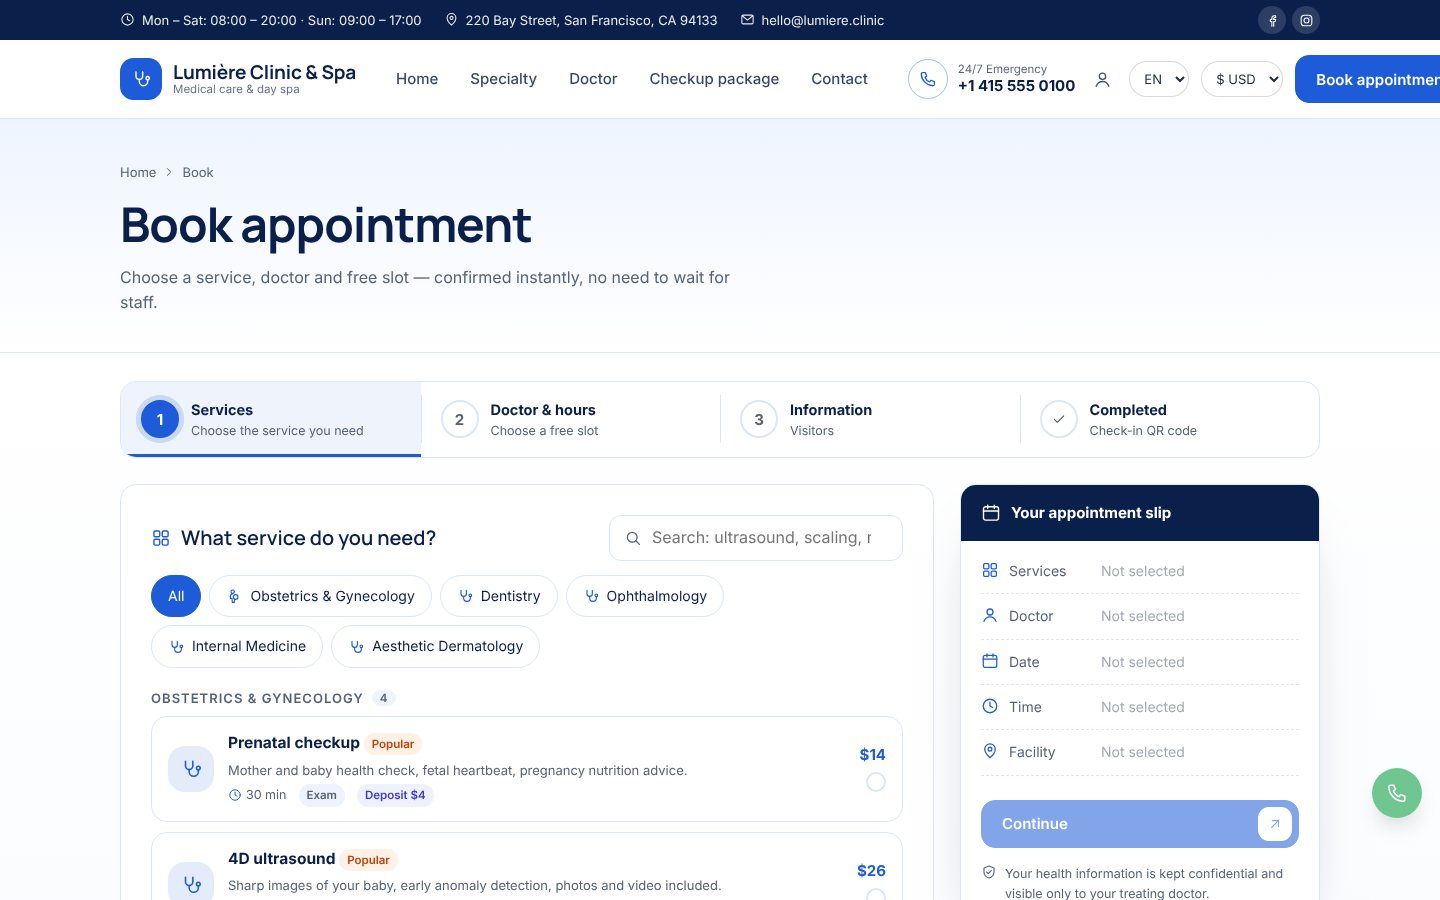
Where: Website→/booking
Clients pick a service, a doctor and a free time; the slot is held at once and a QR check-in code is shown.
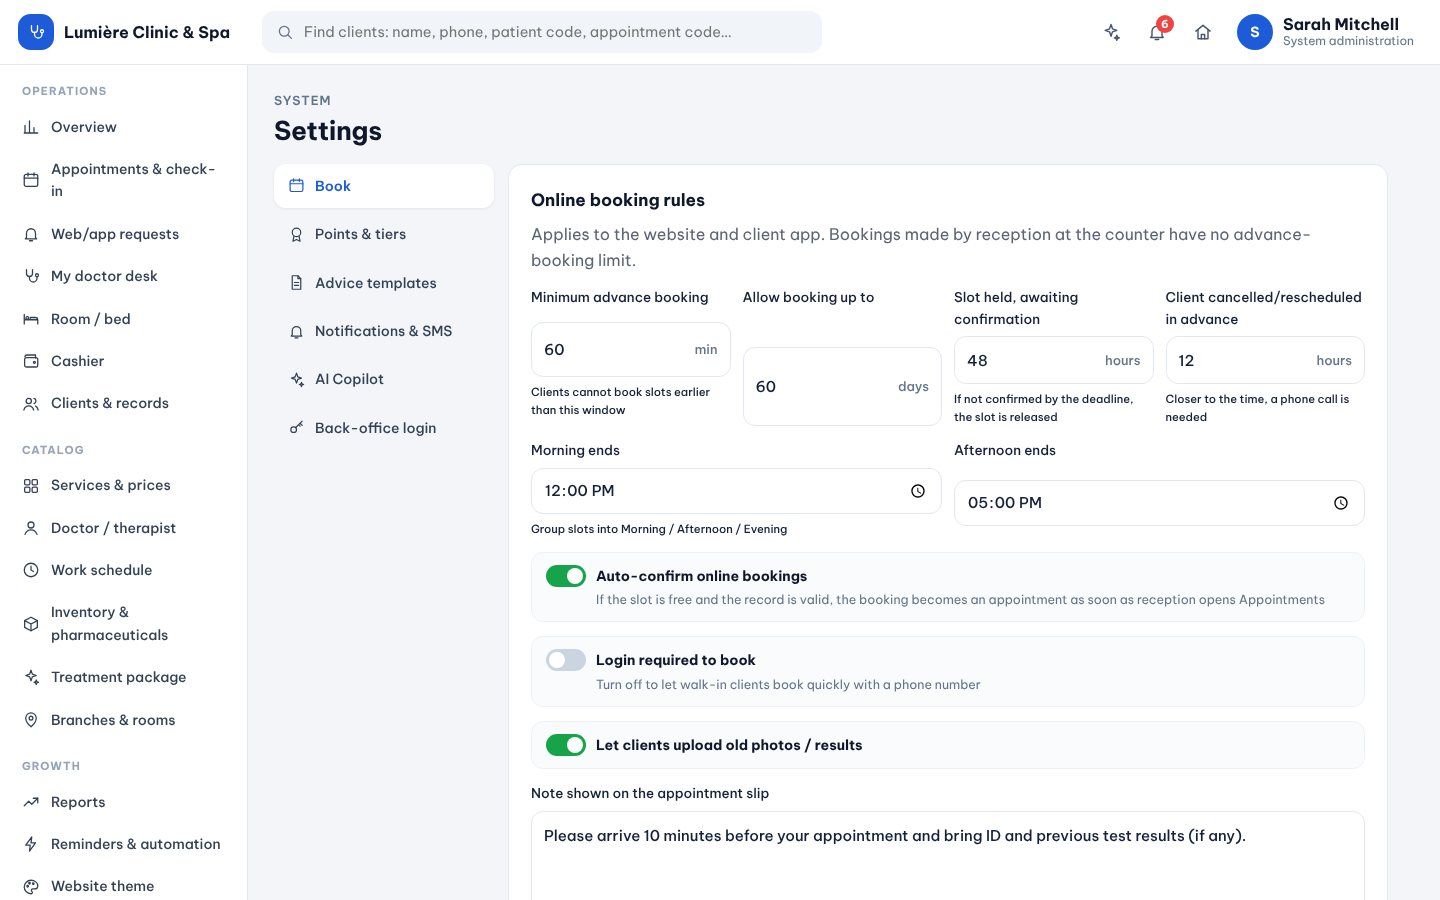
Set the rules in Settings → Book: minimum notice, how far ahead, how long a slot is held, auto-confirm, login required.
Each doctor's free times come from Work schedule and Busy times.
New requests appear in Web/app requests with call and confirm buttons.
lumiere.clinic/booking
Step 1 of booking: choose the service.
Web and app requests
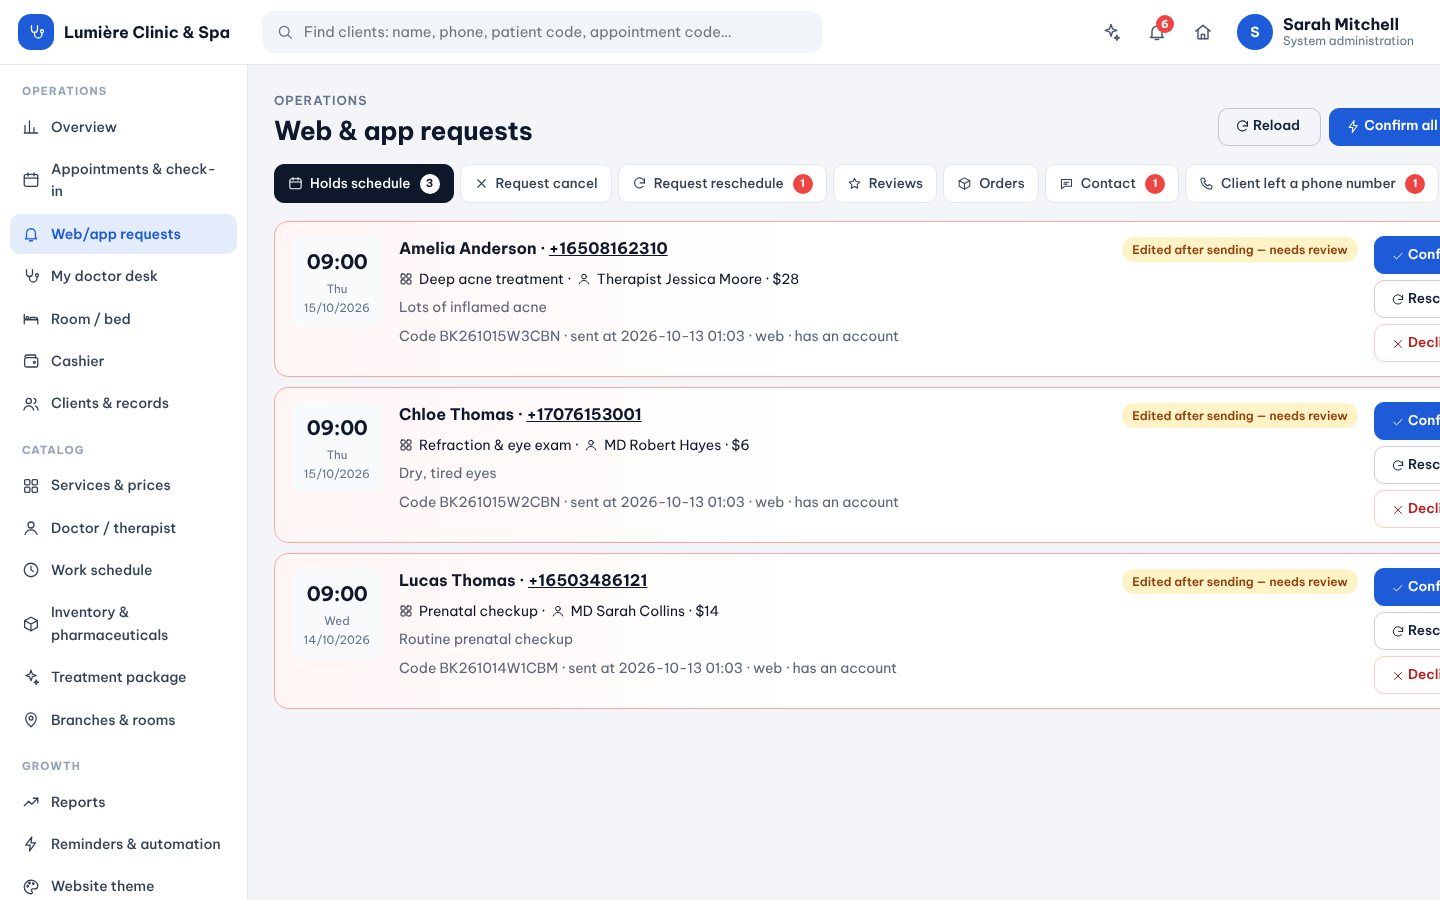
Where: Operations→Web/app requests
Bookings waiting for confirmation, cancel and reschedule requests, reviews and orders from the app.
Open the tab with the red count.
Call the client with one click, then Confirm or answer the request.
Confirmed bookings become appointments on the calendar.
lumiere.clinic/inbox
Bookings held while they wait for confirmation.
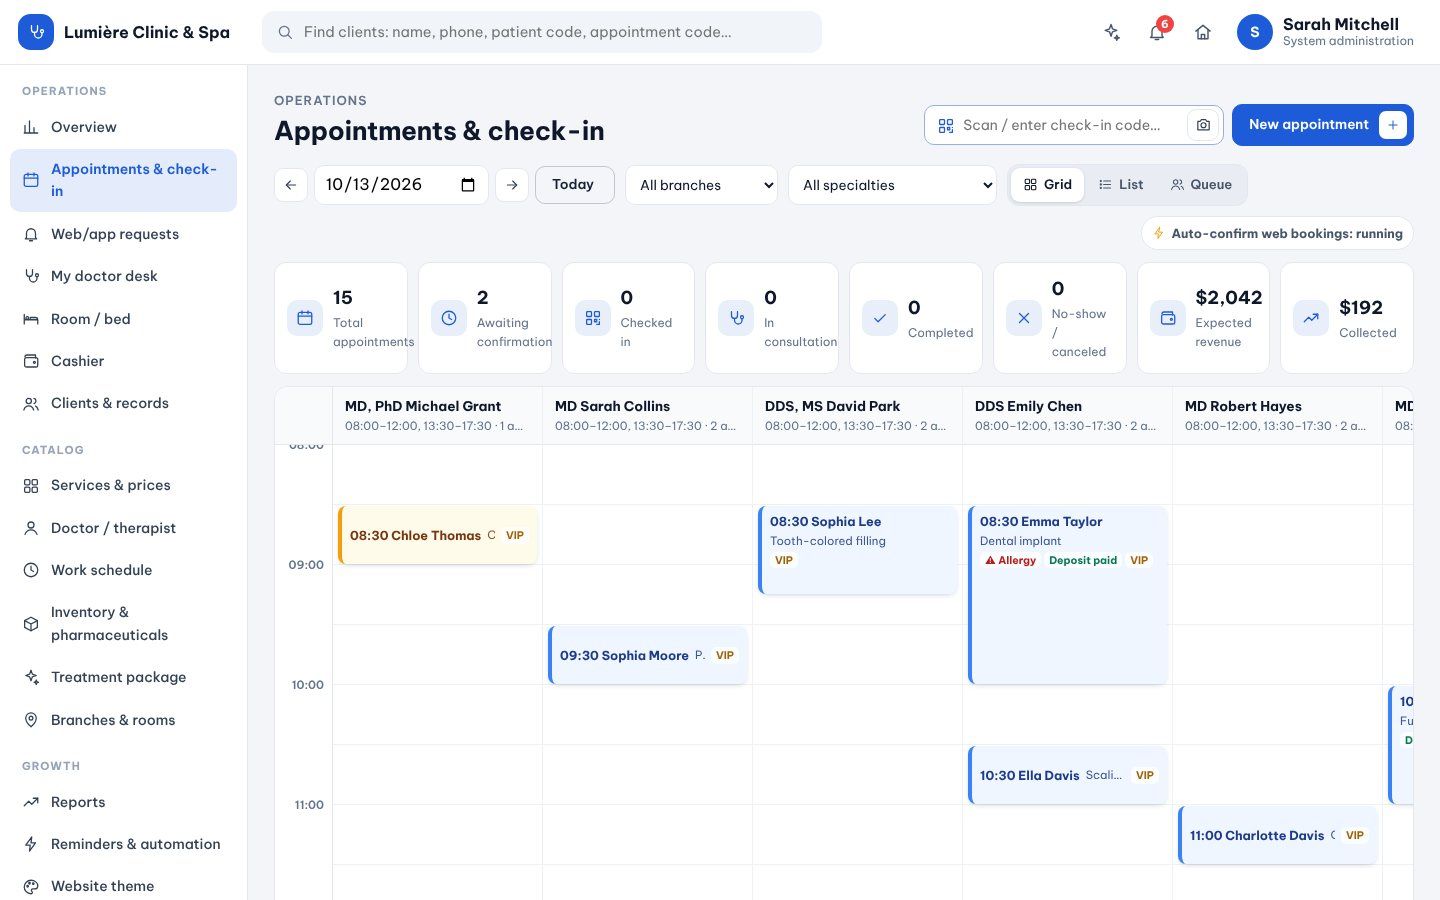
Appointments & check-in
Where: Operations→Appointments & check-in
The day by doctor: expected, waiting, in consultation, completed and no-shows, with the money expected and collected.
Switch Grid, List or Queue; filter by branch and specialty.
Scan the client's QR code (or type it) to check them in.
New appointment books a client at the counter or by phone.
lumiere.clinic/calendar
The calendar by doctor.
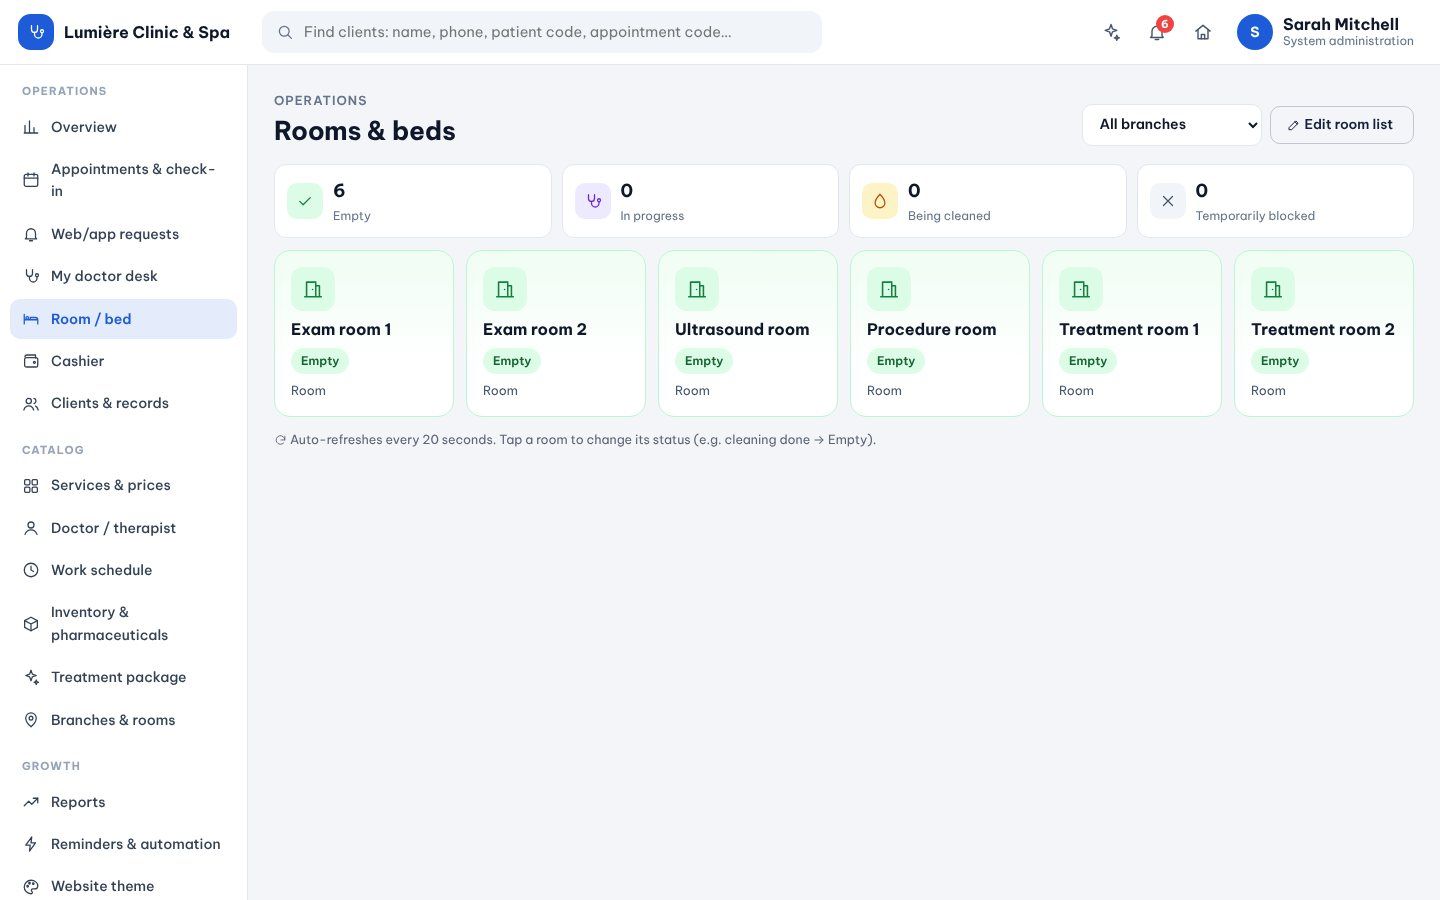
Rooms and beds
Where: Operations→Room / bed
Which rooms are free, in use or being cleaned.
Click a room to change its state.
Add rooms in Branches & rooms.
lumiere.clinic/rooms
The room board.
Doctors & records
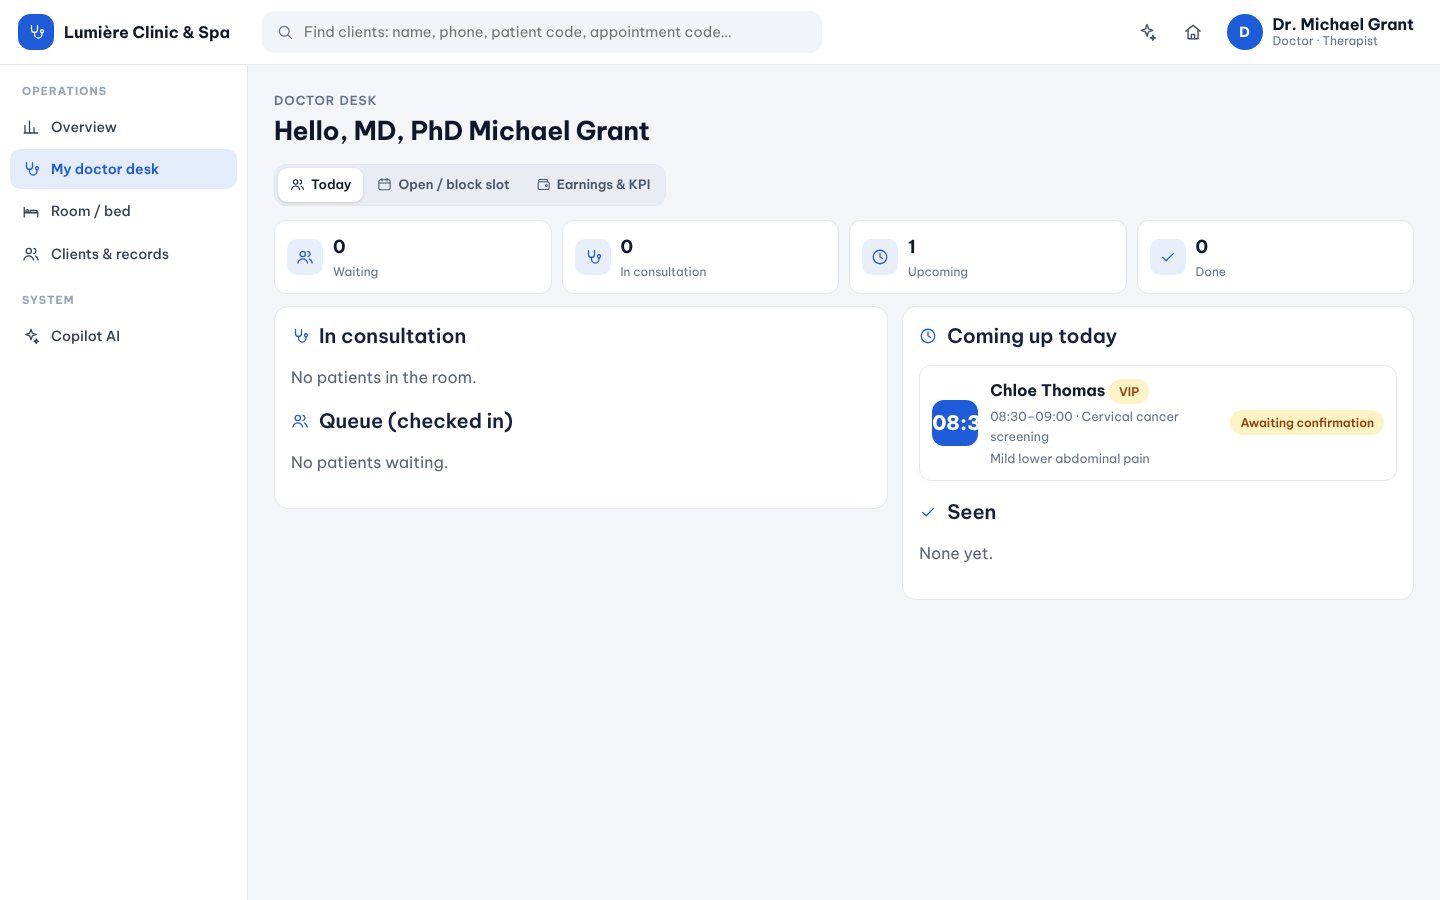
The doctor desk
Where: Operations→My doctor desk
A doctor sees their queue for the day, who is in consultation and who comes next.
Sign in with the doctor's account (linked to the doctor in Doctor / therapist).
Click the next client to open the visit.
lumiere.clinic/doctor-desk
Dr. Michael Grant's desk.
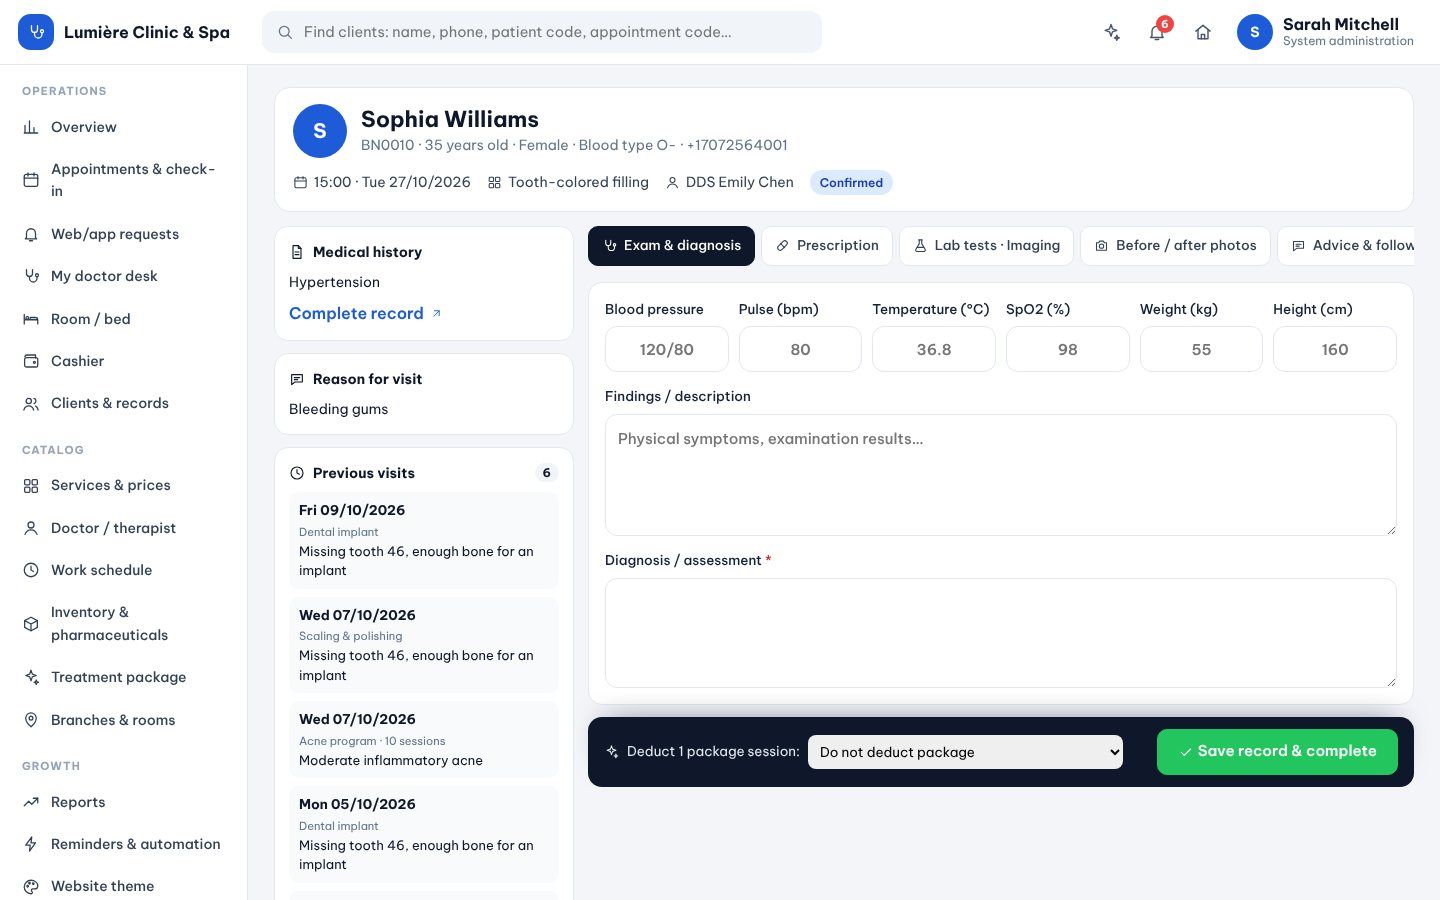
Examine a client
Where: My doctor desk→Visit
Vital signs, findings, diagnosis, prescription, lab tests and imaging, before/after photos and advice — with previous visits beside you.
Tab Exam & diagnosis: blood pressure, pulse, temperature, SpO2, weight, height; findings and the diagnosis.
Tabs Prescription, Lab tests · Imaging, Before / after photos, Advice & follow-up.
Choose whether to deduct a package session, then Save record & complete.
lumiere.clinic/visit/216
A visit open on the doctor's screen.
Clients and records
Where: Operations→Clients & records
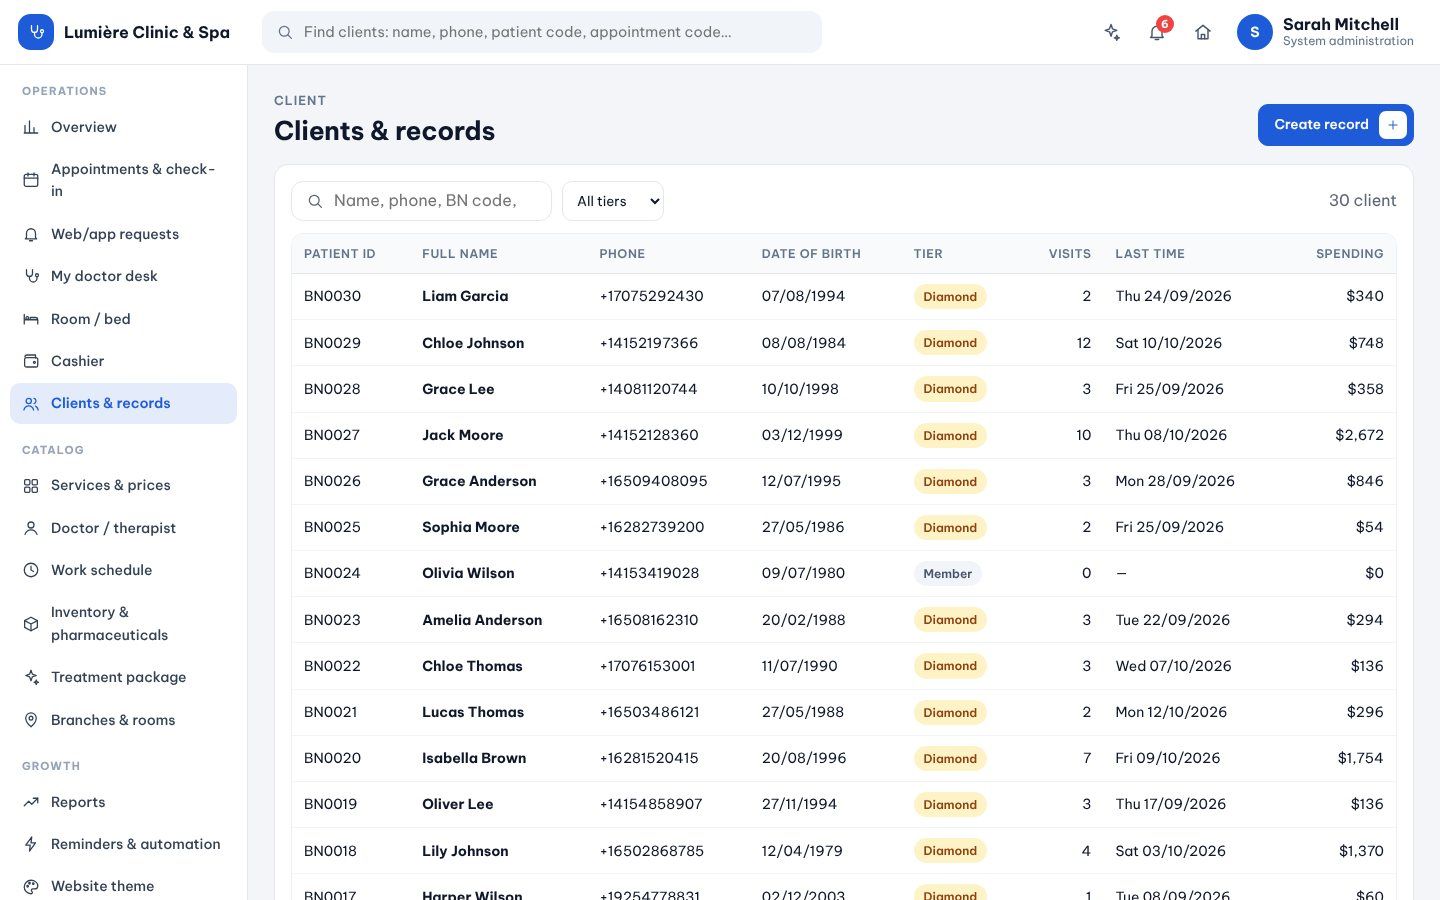
Every client with code, phone, tier, visits, last visit and spending.
Search by name, phone or code; filter by tier.
Open a client for medical history, allergies, visits, results and packages.
Create record adds a new client.
lumiere.clinic/patients
The client list.
Catalogue & money
Services, packages and doctors
Where: Catalog→Services & prices
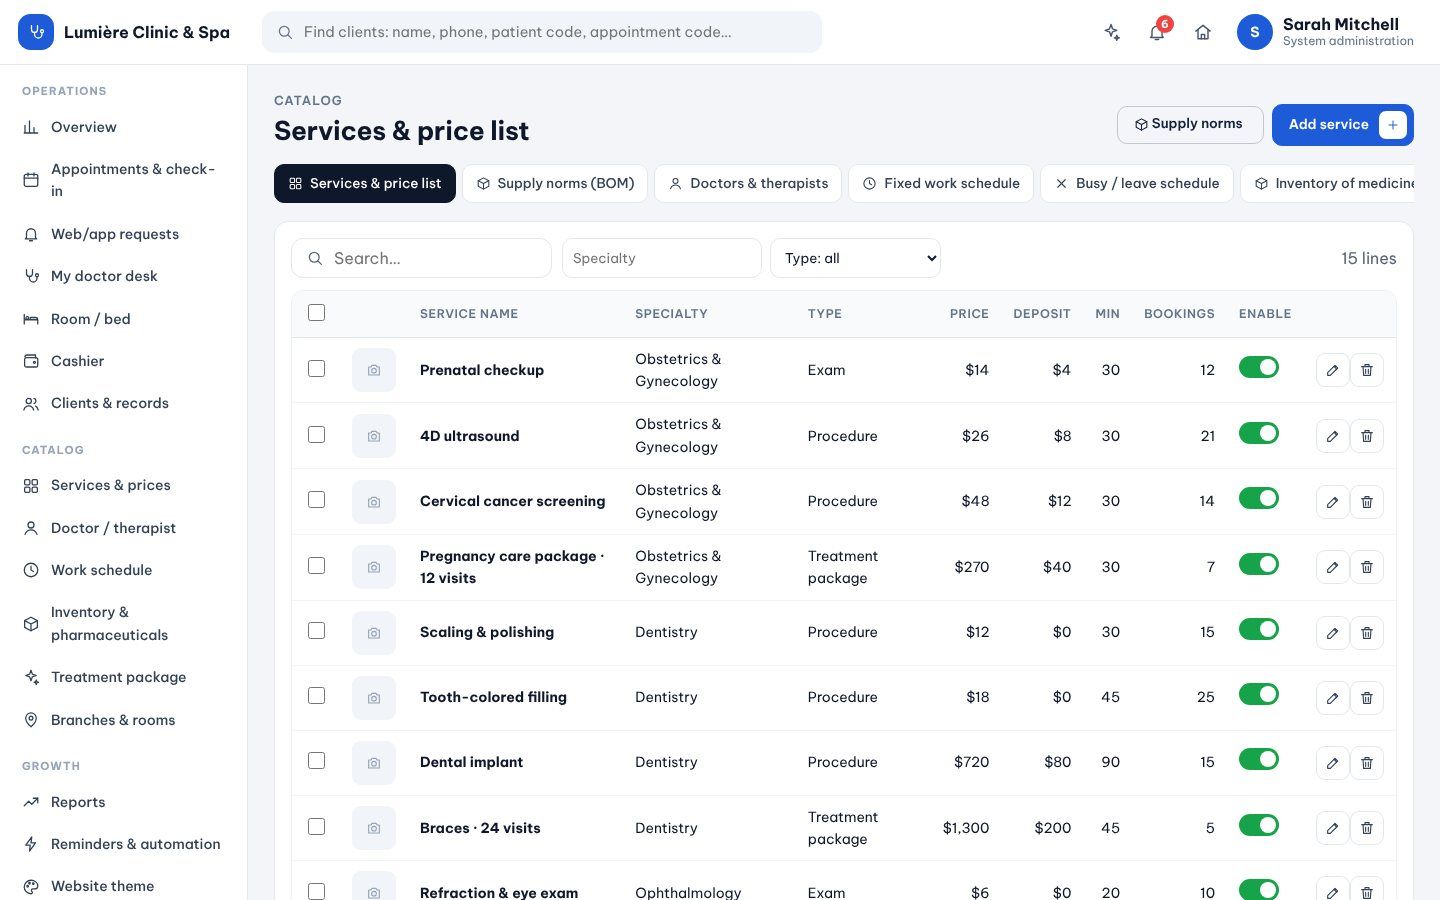
Services with specialty, type, price, deposit, duration and online booking; multi-session treatment packages; doctors and their schedules.
Doctors & therapists and Fixed work schedule; Busy / leave schedule blocks time.
lumiere.clinic/manage
Services & price list.
Reports
Where: Growth→Reports
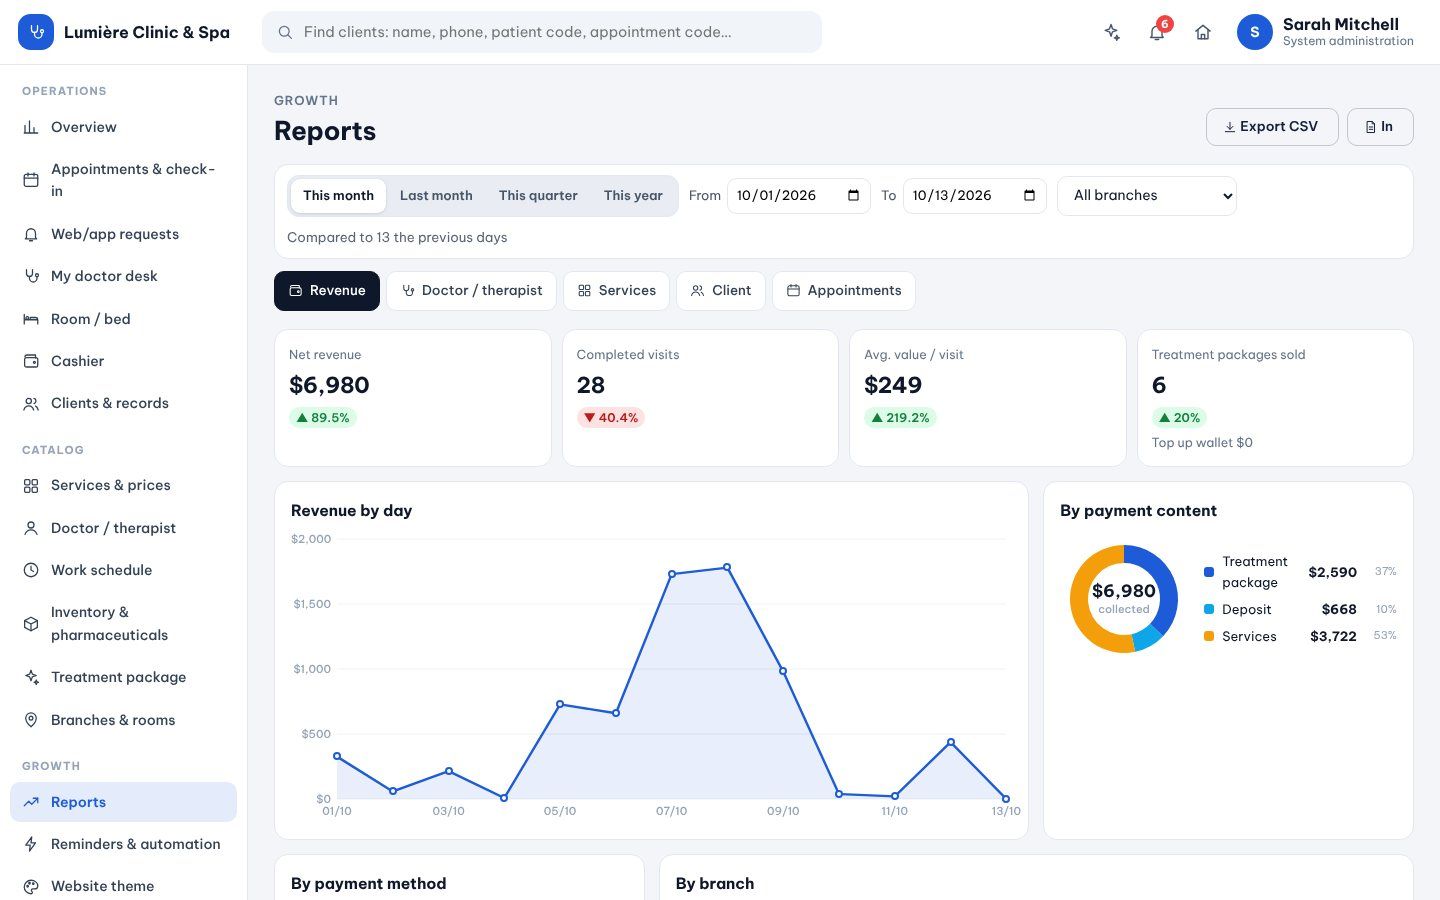
Revenue, completed visits, average per visit and packages sold — by day, payment method, branch, doctor and service.
Pick this month, last month, quarter, year or your own dates.
Switch tabs: Revenue, Doctor / therapist, Services, Client, Appointments.
Export CSV for your accountant.
lumiere.clinic/reports
Revenue report.
Reminders & automation
Where: Growth→Reminders & automation
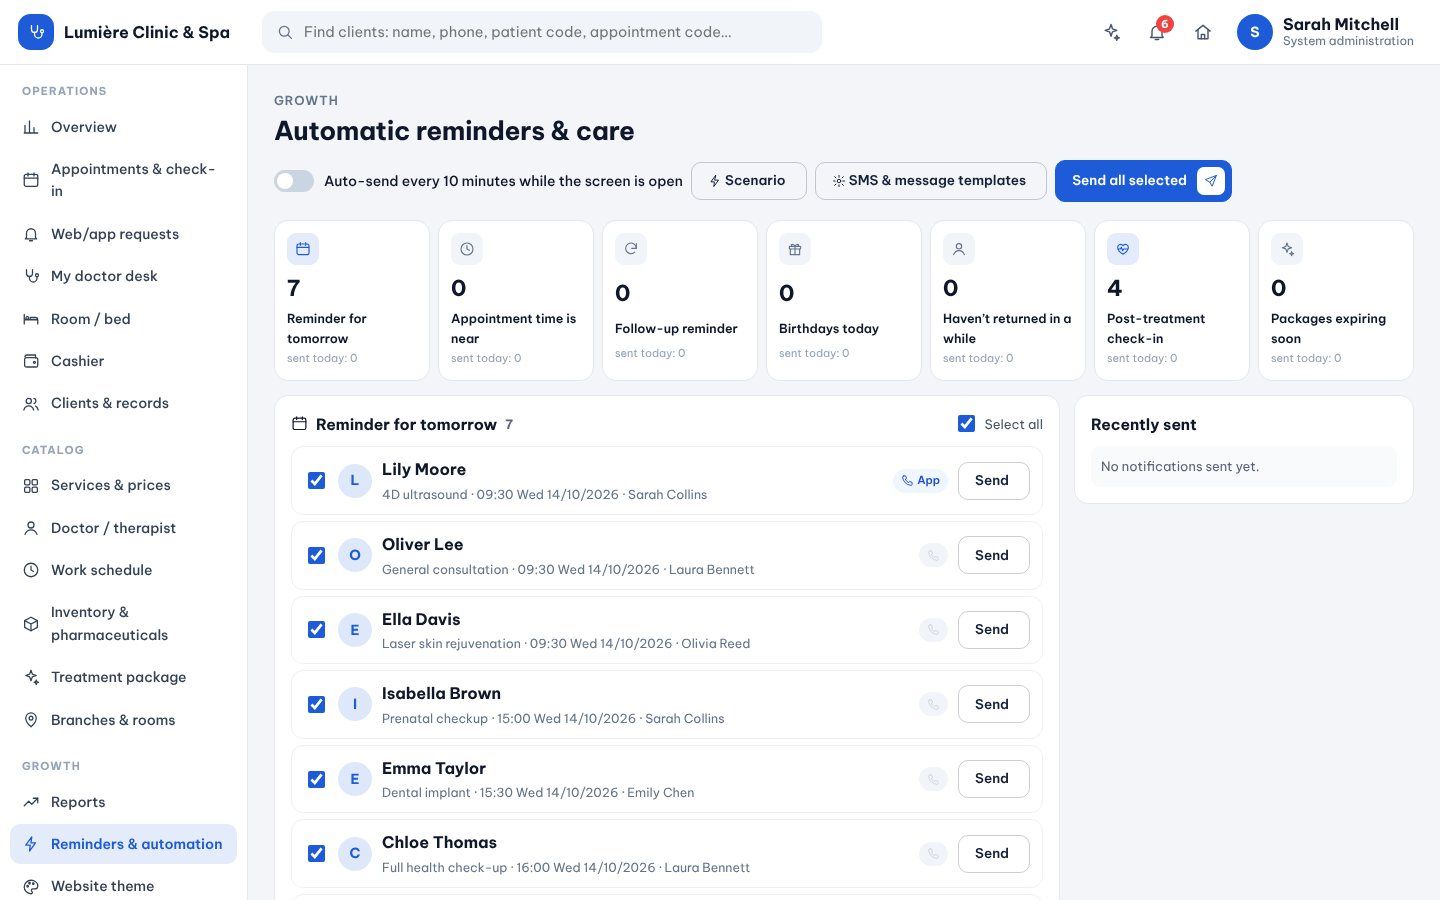
Reminders for tomorrow, follow-up visits, birthdays and clients who have not come back.
Turn on Auto-send every 10 minutes while the screen is open, or send by hand.
Tick the clients and click Send all selected.
For full journeys by email, Zalo and SMS, install the Booking CRM.
lumiere.clinic/automation
Reminders for tomorrow.
Settings
Where: System→Settings
Booking rules, points and tiers, advice templates, notifications and SMS, AI Copilot and back-office login.
Book: online booking rules.
Points & tiers: points per spending and tier thresholds.
AI Copilot: provider and your own key — it stays on the server.
lumiere.clinic/settings
Online booking rules.
Languages & currency
Add a language and translate it with AI
Where: Copilot→🌐 button→Languages
The screens and the website can speak any language. The texts of every language live in the platform; AI translates what is missing and you check it before saving.
Sign in as the platform's super admin (only he can save languages) and open Copilot. Click the round 🌐 button, or ask Copilot “languages”.
Tab Languages → Add a language: name (Tiếng Việt), code (vi) and a flag. It starts with every English text.
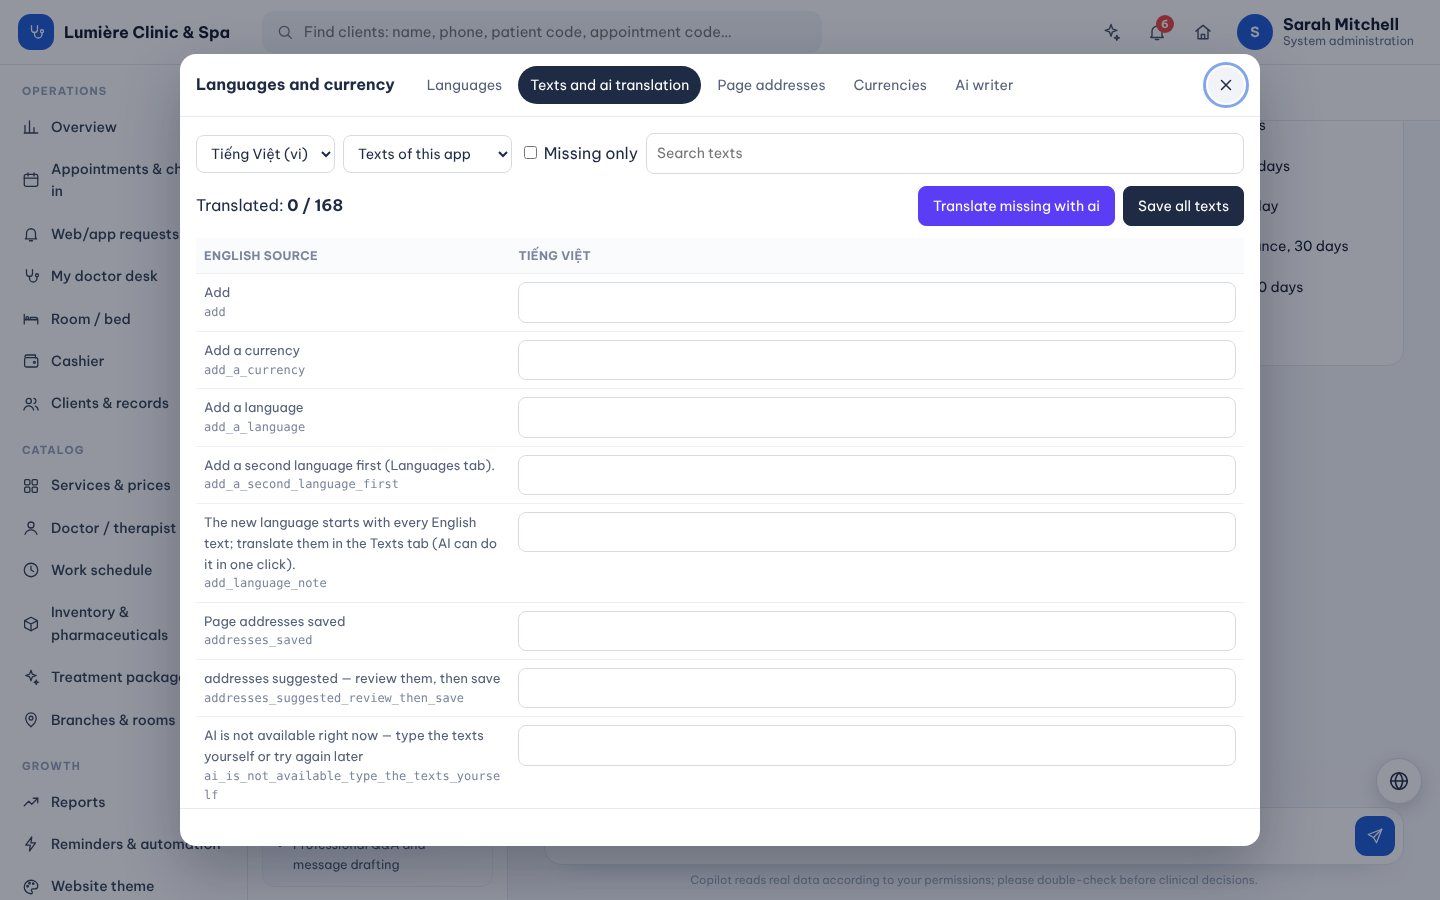
Tab Texts & AI translation: pick the language, then Translate missing with AI. AI fills only empty boxes, in small batches; Stop pauses it.
Read the texts marked AI, correct what you like, then Save all texts.
Good to know: AI runs in three ways: your own key (Settings → AI, called from the server), else the platform's AI, else you type the texts yourself.
Good to know: Placeholders such as :n and {name} are kept exactly as they are.
lumiere.clinic/copilot#languages-texts
Texts & AI translation in the Languages & currency panel.
Choose the main language
Where: 🌐 Languages→Main language
Visitors who have not picked a language see the main one — Vietnamese for a clinic in Vietnam, for example. It applies to every product on the website.
Open the 🌐 panel, tab Languages.
Under Main language pick the language and click Save.
Visitors switch any time with the language menu in the header; their choice is kept for a year.
Good to know: Your own texts typed on the website screens are shown in the main language; other languages show their translation.
Page addresses per language
Where: 🌐 Languages→Page addresses
Each page can have its own address in each language — /booking in English, /dat-lich in Vietnamese.
Tab Page addresses, pick the language.
Suggest addresses with AI fills the empty ones; edit any of them.
Only small letters a–z, digits and dashes; two pages may not share an address. Save addresses.
Show prices in several currencies
Where: 🌐 Languages→Currencies
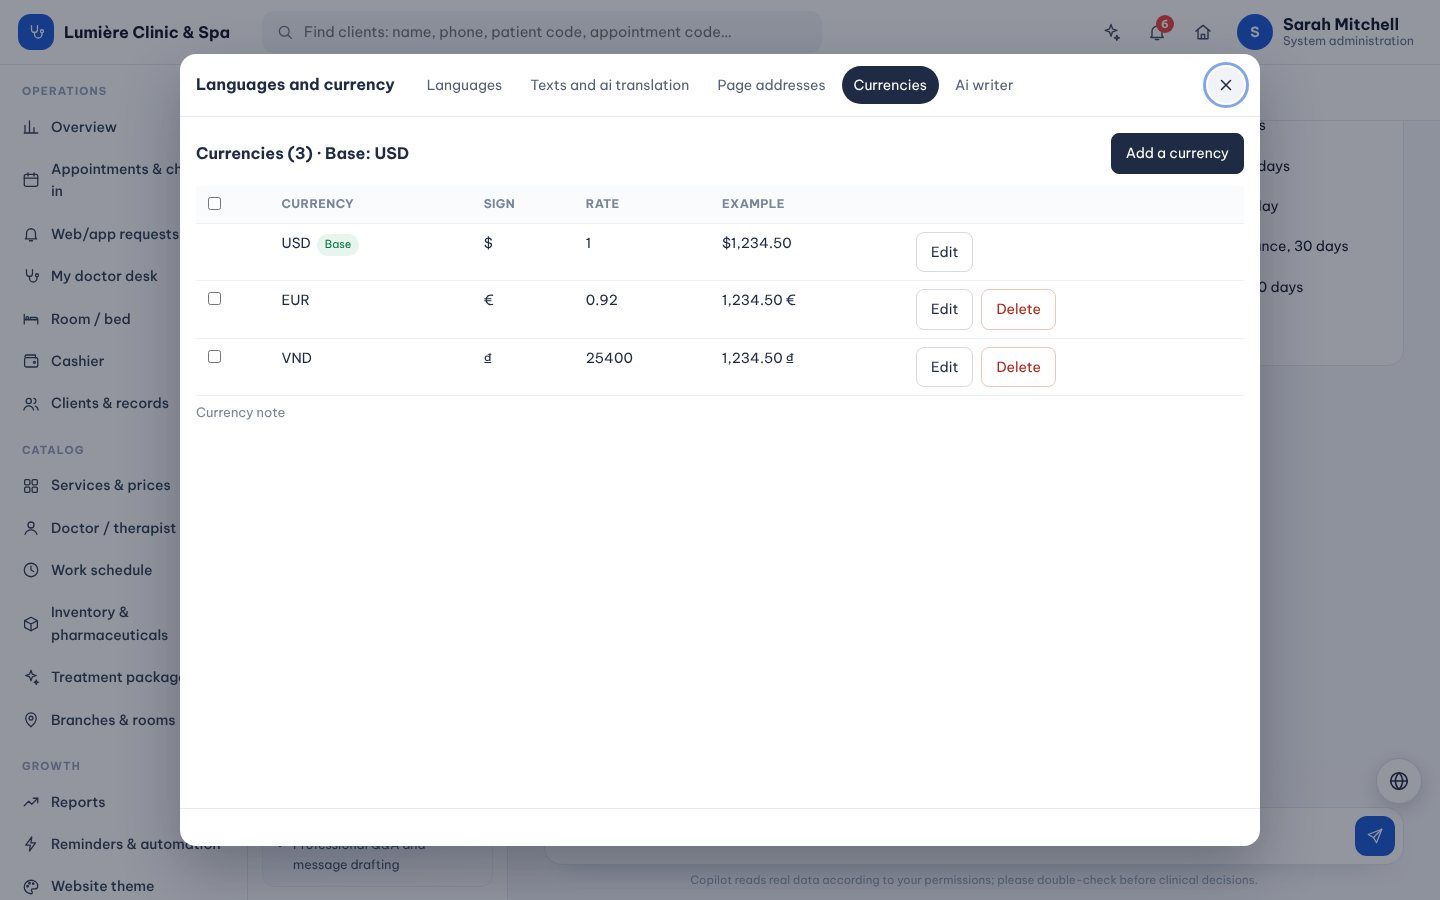
Visitors see prices in the currency they choose. Every amount is stored in the base currency (rate 1); staff screens always show the base.
Tab Currencies → Add a currency: code (EUR), sign (€) and the rate for 1 unit of the base.
Choose the side of the sign and the space, check the example, save.
Clinic: in Settings → Website → Currency choose Platform currencies so visitors can switch.
Good to know: Changing a rate never changes a stored amount.
lumiere.clinic/copilot#languages-money
Currencies: the base has rate 1; the others are shown to visitors only.
Write and improve content with AI
Where: 🌐 Languages→AI writer
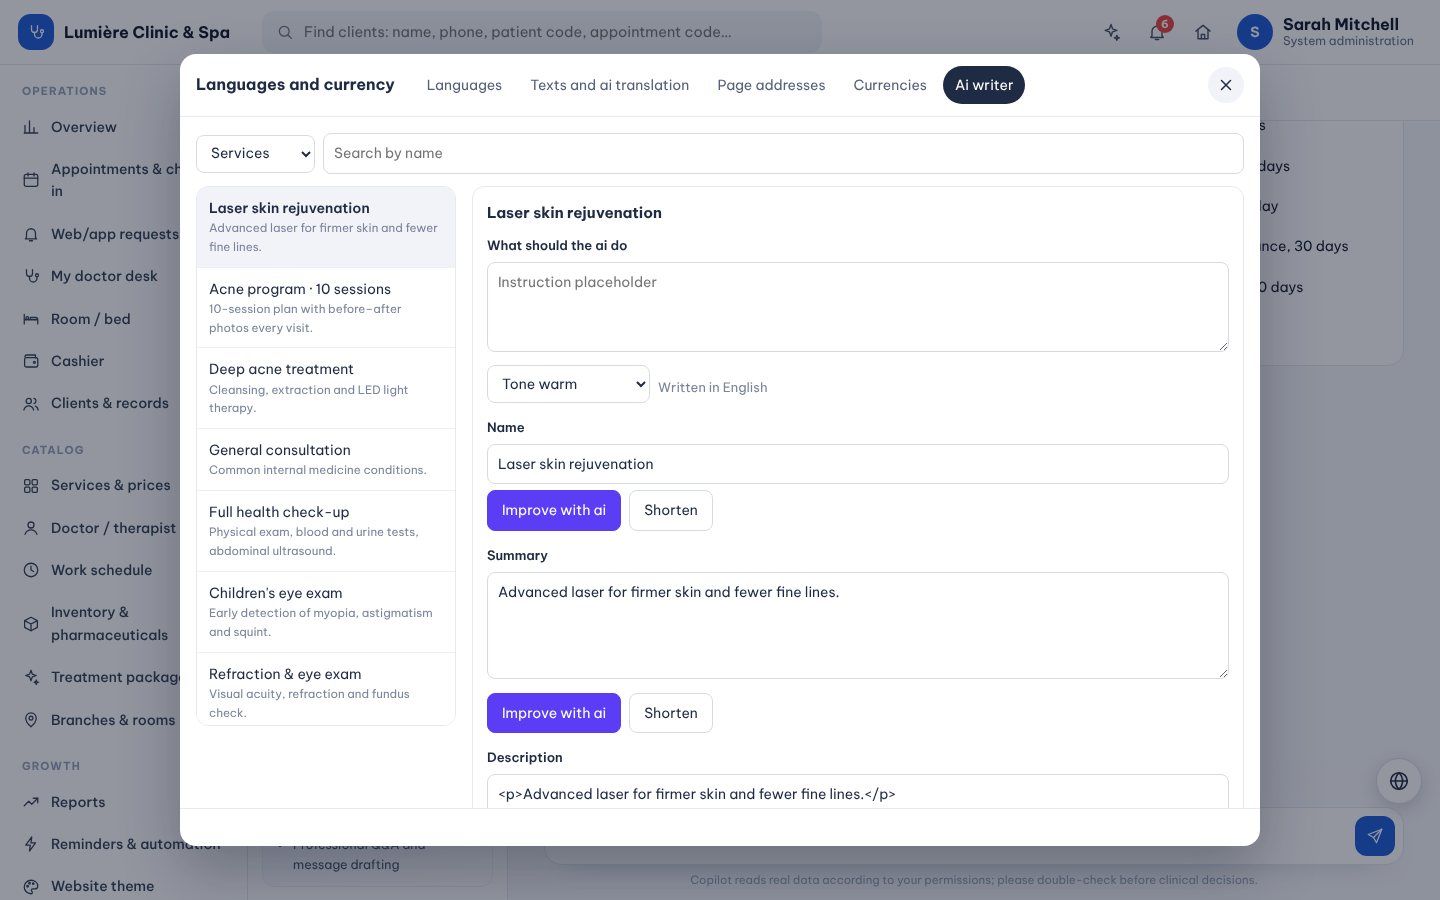
Rewrite your services, specialties, doctor profiles and popups in the main language: write from scratch, improve or shorten, with a tone and an instruction.
Tab AI writer, pick the list and the item.
Optionally type what the AI should do and choose a tone.
Write with AI, Improve with AI or Shorten on a field, read the result, then Save.
Good to know: The AI only uses facts already written there or in your instruction — never invented prices or medical claims.